Add/Edit Fields will basically allow you to do 2 things
- Edit existing fields by performing math (or text) operations on the selected field.
- Add new fields based on the math (or text) operations on selected fields.
Well, you can do much more than that. Let’s get directly to the examples.
How to Add New Fields In DigiXport?
You can follow the below steps to add new fields:
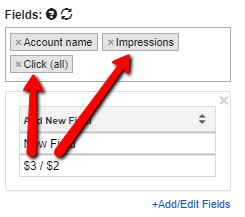
- Open the DigiXport sidebar.
- Click on +Add/Edit fields link below the fields section.
- Select “Add New Field” in the dropdown.
- You’ll see 2 fields
- Header Field
- Formula Field
Let’s understand the formula field…
To use the values of selected fields in the formula simply use $1 for the first field, $2 for the second field & so on….
As per settings in the below image, the output will contain a new column with the resulting math operation -> click / impressions.
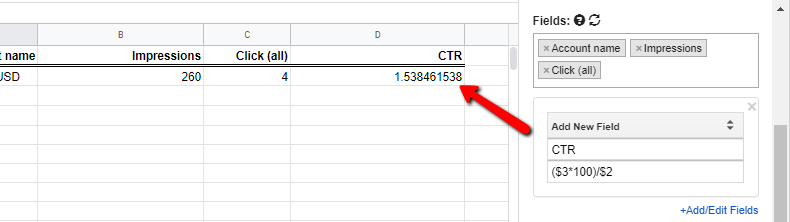
Here’s a practical example, where we calculate new field CTR with the formula as ($3*100)/$2.
You can even use sheet formulas such as
- lower(“$1”) -> it will lower case all the text of first column
- text(“$3/$2″,”%0.00”) -> it will format the values as %.
- & so on….
Note: While using placeholders -> “$n”, if n is greater than no. of the selected field, then $n will simply result in 0.
How to Edit Existing Fields in DigiXport?
- Open the DigiXport sidebar.
- Click on +Add/Edit fields link below the fields section.
- Select the field to edit from the dropdown.
- You’ll see the formula field
It’s similar to add fields, the only difference is while referencing the value of the currently selected field, simply use $1 as a placeholder in the formula.
So if you select Account Name & use formula as -> =lower(“$1”). It will lowercase the account names column.
How Does Add/Edit Fields Feature Work?
There are 2 types of operations taking place within “add/edit fields” feature:
1.) Server Side Operations
In server-side operations, the calculation is done on the server-side & the output is imported to google sheets. Currently, only Math operations are supported for server-side operation.
You can use these operations to directly get the calculated output (For Eg: Currency Conversion, GA upload, etc)
To get started you can simply write: $1*100 (to multiply by 100)
or other examples include
- ($1*100)*1.1+100
- ($1+10)/100
- ($1/10)+100
- etc
Note: Server-side operations do not need “=” (equal to) sign at the start of the formula.
2.) Client-Side Operations
In client-side operations, the calculation is done on the google sheet server & the output will include the sheet formula. You can use these operations to modify or format the sheet values.
Some examples include
- =Upper(“$1”)
- =Lower(“$1”)
- =$1*100
- =TEXT($1,”0,00″)
- etc
Note: Client-side operations need “=” (equal to) sign at the start of the formula.
In-Built Formulas
In-built formulas in digixport are the formula that will use server-side computation for various use cases. Here are the formulas:
1.) cellValue([cellAddress])
You can perform server-side operations with the imported data & the sheet’s cell value.
So let’s say if you want to multiple the spend data with the currency conversion value on cell “A1” on the sheet named “RAWData”. You can simply use the formula: $1*cellValue(RAWData!A1)
cellValue(cellAddress)
- cellAddress: the address of the cell. foreg: sheet!A1, sheet!D4, etc
As there are many use cases, we’ll take a look at how you can use it to import different
- Math Operations
- Date Formats
- Number & Currency Formats
- Text Format
- Advanced – Rendering Images
Math Operations
You can perform math operations on NUMBER type fields.
Say, you want to convert the currency, you can select the spend & add the formula: $1*cuurencyConversionNumber
Other use cases would be
- Adding -> $1+100
- Subtracting -> $1-100
- Multiply -> $1*100
- Divide -> $1/100
You can even perform complex math operation such as: ($1+100)*1.1+0.67
Note: If you want server-side math operations DON’T include “=” sign. Eg: $1*100 will be computed server side, while “=$1*100” will output as the sheet formula.
Date Formats
By Default, the format of the Date imported via Digixport is YYYY-MM-DD. You can use the “text” formula to change the date formats.
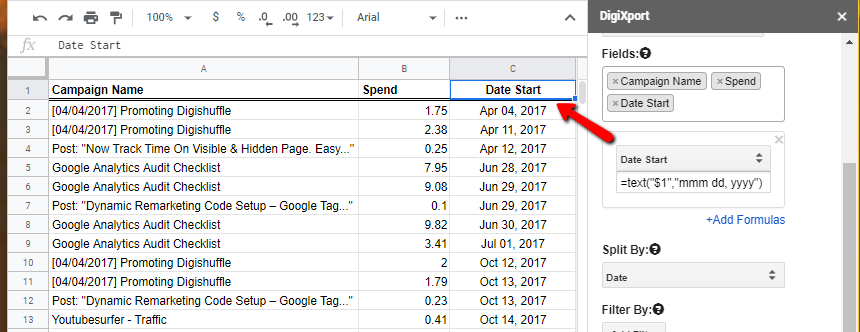
The syntax of the formula is: TEXT(number, format)
Use the “$1” notation in the formula box as a placeholder for that field, so under “date” field the formula would look like: =text(“$1”, “yyyy/mm/dd”)
Below are the other formats you can use. As per Google Sheets, TEXT supports the following date and time patterns:
dfor the day of the month as one or two digits.ddfor the day of the month as two digits.dddfor the short name of the day of the week.ddddfor the full name of the day of the week.mfor the month of the year as one or two digits or the number of minutes in a time. Month will be used unless this code is provided with hours or seconds as part of a time.mmfor the month of the year as two digits or the number of minutes in a time. Month will be used unless this code is provided with hours or seconds as part of a time.mmmfor the short name of the month of the year.mmmmfor the full name of the month of the year.mmmmmfor the first letter in the month of the year.yyfor the year as two digits.yyyyfor the year as four digits.
You can try different formats as per your needs (Eg: yyyy/mm/dd, yyyy/dd/mm, mmm dd, yy, etc)
Number & Currency Formats
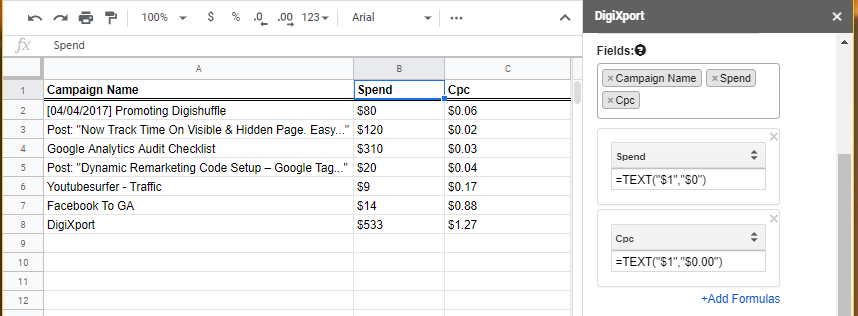
You can use the same “text” formula to change the currency formats. The syntax is the same. =Text(“$1″,”$0.00”)
In the above example, we have formatted the “spend” field with 0 decimal ‘$’ format & “cpc” with 2 decimal ‘$’ format.
For currency using “,” separator instead of “.” (dot), you can check this article for more information.
To round off the currency use =TEXT($1,”$0″). Output: $543.66 -> $544.
For other number formats as below, use these formulas:
- 1,000 -> =TEXT($1,”0,00″)
- 12.32% -> =TEXT($1,”0.00%”)
- 12.3% -> =TEXT($1,”0.0%”)
- 12 -> =TEXT($1,”0″)
- 4 1/2 -> =TEXT(4.5 ,“# ?/?”)
- 5.32E+05 -> =TEXT(532000,“0.00E+00”)
Here’s the google sheet doc for TEXT formula:
0forces display of zeros if a number has fewer digits than the format specifies. For example,TEXT(12.3,"000.00")produces012.30. Numbers which have more digits to the right of the decimal point than the pattern are rounded to the indicated number of places. For example,TEXT(12.305,"00.00")results in12.31.#is similar to0but does not force the display of zeros on either side of the decimal point. For example,TEXT(12.3,"###.##")produces12.3.
Text Formats
You can use formulas like replace, lower, upper & more to modify the output field’s text. Say you want to lower case all the campaign names.
You can select the campaign name & add the formula: =Lower(“$1”)
Other use cases would be
- Capitalize Campaign Name -> =Upper(“$1”)
- Concatenate String To Campaign Name -> =$1&”String”
- Check IF Campaign Name Contains a String (Say “Shoes”) -> =REGEXMATCH(“$1”,“Shoes”)
- Extract A String From Campaign Name -> =REGEXEXTRACT(“$1”,“regular_expression”)
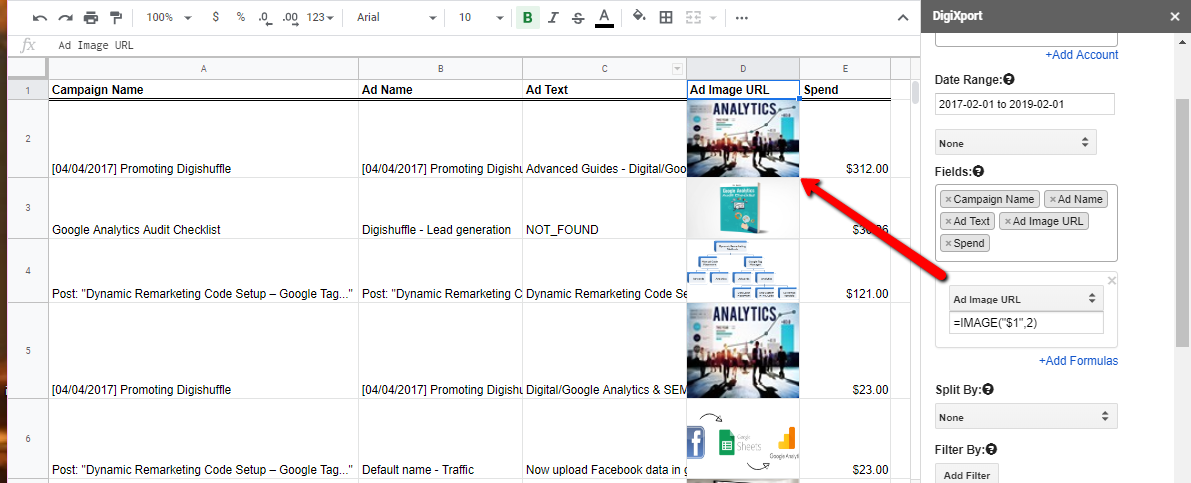
Advanced – Rendering Images & Hyperlinking URLs
If you want to render the image (say facebook ad image) in the sheet, you can do so by using “Image” formula. Make sure to select Ad image URL field.
Formula: =IMAGE(“$1”,2)
As per google sheet docs, here’s the syntax for =image
IMAGE(url, [mode], [height], [width])
url– The URL of the image, including protocol (e.g.http://).- The value for
urlmust either be enclosed in quotation marks or be a reference to a cell containing the appropriate text.
- The value for
mode– [ OPTIONAL –1by default ] – The sizing mode for the image1resizes the image to fit inside the cell, maintaining aspect ratio.2stretches or compresses the image to fit inside the cell, ignoring aspect ratio.3leaves the image at original size, which may cause cropping.4allows the specification of a custom size.- Note that no mode causes the cell to be resized to fit the image.
height– [ OPTIONAL ] – The height of the image in pixels.modemust be set to4in order to set a custom height.width– [ OPTIONAL ] – The width of the image in pixels.modemust be set to4in order to set a custom width.
Note: You cannot add more formulas than the number of selected fields. Only use $1 as a placeholder for selected fields