How to import the data to Google Sheets via DigiXport Addon?
Assuming you have already authorized the datasource, we’ll now look at how you can import the data.
To import the ads data in sheets, you need to input 3 things (compulsory)
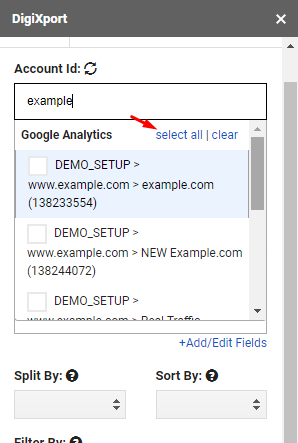
Account ID:
- Account Id dropdown list is only available after authorizing the data source.
- You can select one or more account ids from the dropdown.
NOTE: Only premium users can select multiple accounts . - You can also search the account name and select the accounts in bulk. For Eg: You can search for “ClientA” and click on select all.
- For more information, check here.
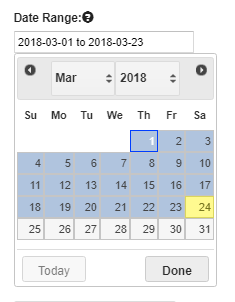
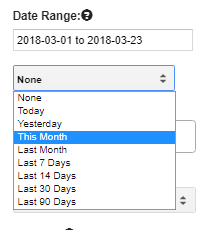
Date Range:
- You can select Date Range from the drop down.
- You can also select Dynamic date ranges by clicking on this month or last month, last X days, etc.
- For more detailed date range seletion methods check here.
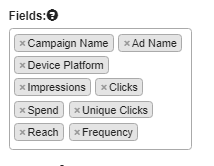
Fields
- Fields are simply the columns you want to import as headers in the google sheet.
- Fields are populated automatically once you select the data source.
- If you find some fields missing try clicking on the refresh icon on top of fields box. (else you can contact the support if some of the fields are missing)
- If the fields are not compatible with other fields, you will get an incompatible fields error if they are.
- You can even pivot the rows by clicking on fields and color coding it.
- For more information, click here.
Add/Edit Field
- You add new fields or edit the existing ones by using formulas.
- For more information, check here.

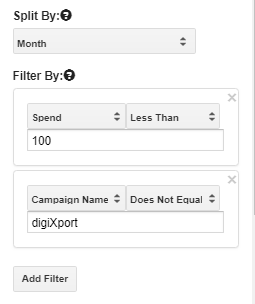
SplitBy & Filters
- Split By: You can split the data by day, week, month.
- Filter By: Use the fields to filter the data.
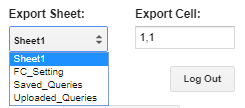
Export Sheet & Cell
- NOTE: By default, the data will be imported to the currently active sheet cell. (If export sheet and export cell are not specified.)
- Export Sheet: Name of the sheet in the current spreadsheet
- Export Cell: The cell position (row,column) or A1 notation (A1).
- Additional Options: Select the additional options to enable GAupload, noHeaders, Multiply fields,etc
- Export: Cliking here will simply Export the Data to google sheets based on the input provided.
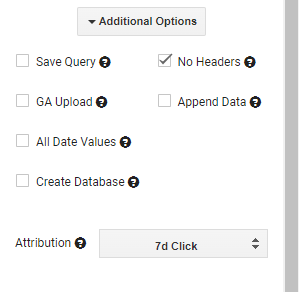
Additional Options:
- Save Query: It will generate the query ID in the ‘Saved_Queries’ sheet. For more information, check here.
- No Headers: Enabling it will remove the headers row from export.
- GA Upload: Enabling this will export ads data in the format compatible for Google Analytics Upload.
Eg: You can use ‘facebook’ & ‘cpc’ as source & medium for data export. The source & medium column will be appended as the last columns as export. For Facebook, you’ll have an option to select the UTMs from Ad. Click here for more information. - Append Data: Data will be exported after the last row. (Headers will not be included)
- Create Database: Data will be imported with the unique date column. Good for importing data with longer date range. Also, you can use it if you’re using it to import the sheet data to the data studio. For more information, check here.