Shopify is one of the best e-commerce platform which helps users to start, run and grow your e-commerce store.
There are 2 methods to import the Shopify data into google sheets.
- [NEW] One click integration via DigiXport. [No token required]
- Custom API method.
For quick start, you can follow the method no. 1 by clicking on the link below.
[NEW] One click integration via DigiXport. [No token required]
In this article, we’ll show you the Custom API method to get the Shopify data into google sheet.
Once you get the token correctly, you can then use any endpoint as mentioned in their documentation.
Let’s start with the setup.
- Steps to fetch the Shopify access token
Step 1: Create a Shopify custom app
Step 2: Set Admin API access scopes
Step 3: Get the Admin API access token
- Steps to fetch Shopify Orders data in Google Sheet
Step – 1: Setup the API Url and Authorization header
Step – 2: Import the data to google sheets - Steps to fetch Shopify Customers data in Google Sheet
Step – 1: Setup the API Url and Authorization header
Step – 2: Import the data to google sheets - Filtering/Ordering the columns & rows (Optional)
- Key Points
- List of fields names for Shopify Orders API
- List of fields names for Shopify Customers API
Steps to fetch the Shopify access token:
Step 1: Create a Shopify custom app
Assuming you have a Shopify store live you can follow the below steps:
- Go to your Shopify store & open the Shopify admin page.
- (Old UI) On the left hand side click on Apps > Develop Apps.
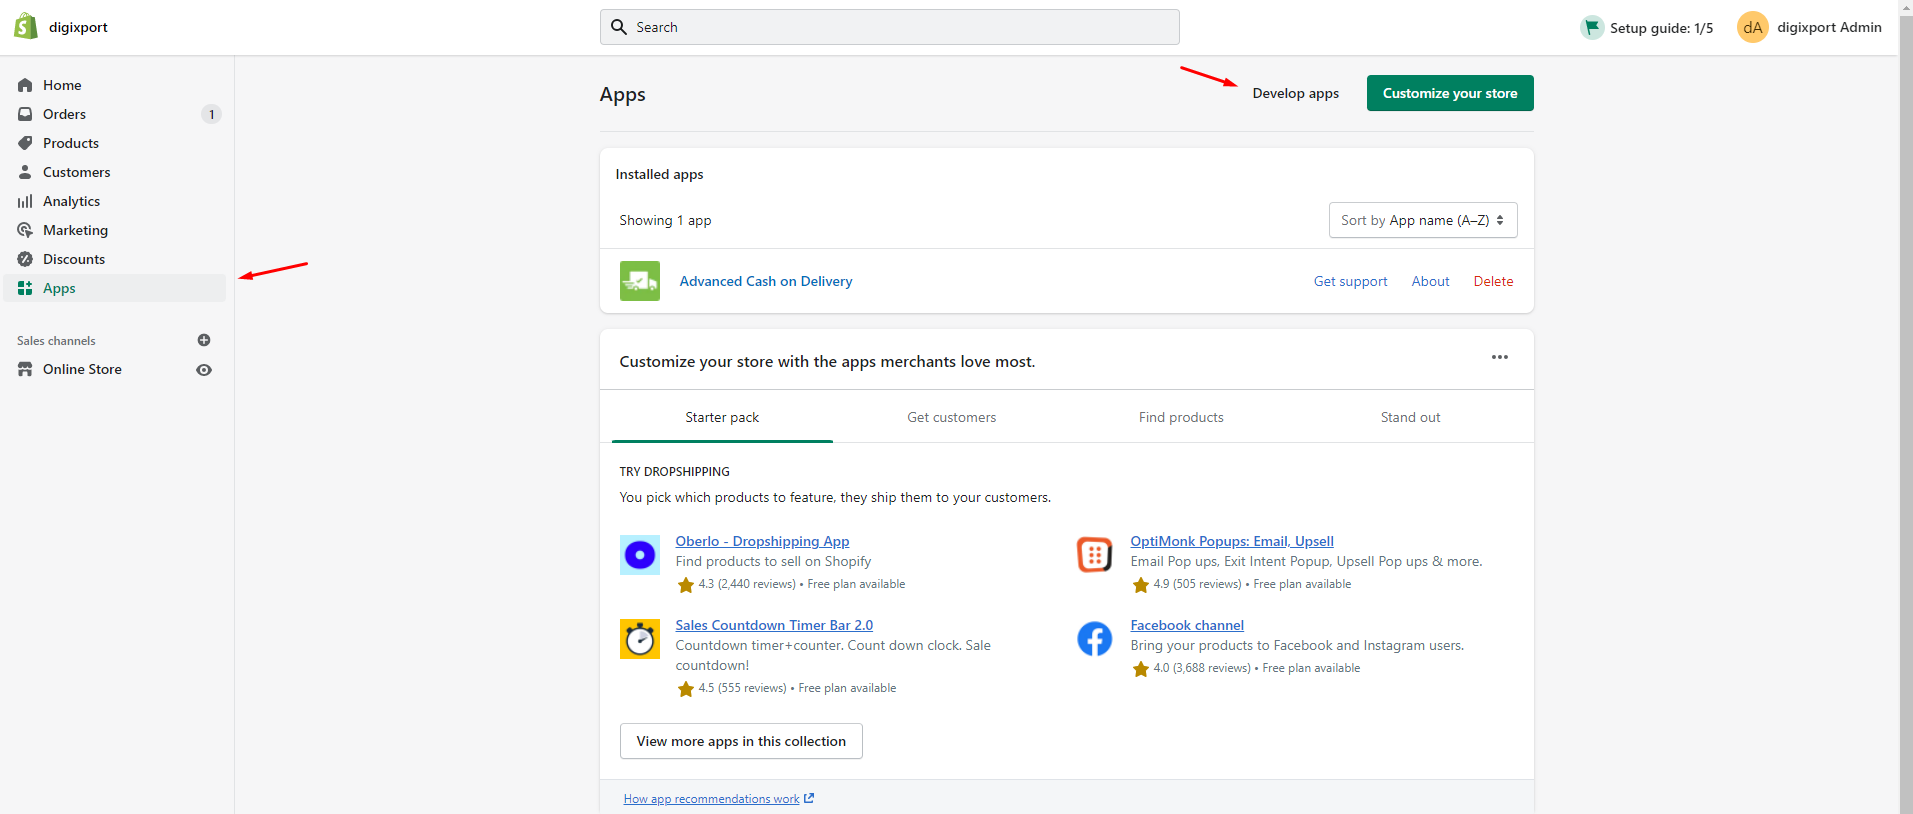
- (New UI) On the left hand side click on Apps > Develop Apps
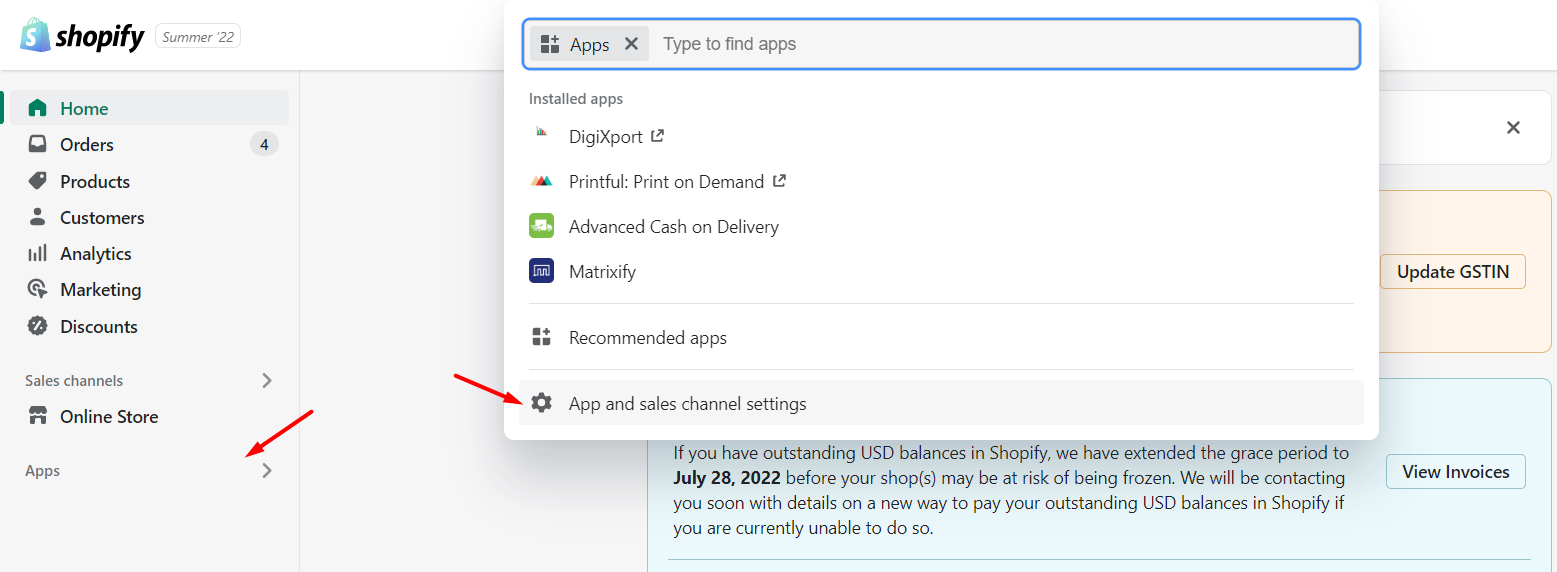
- (New UI) Click on Apps and sales channels on left side menu
- (New UI) Click on Develop Apps.

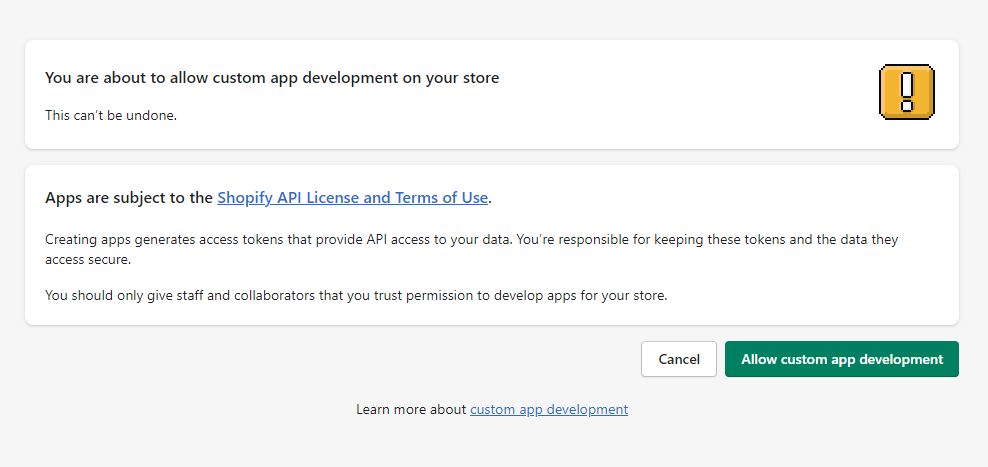
- (Old UI) Click on allow custom app development.
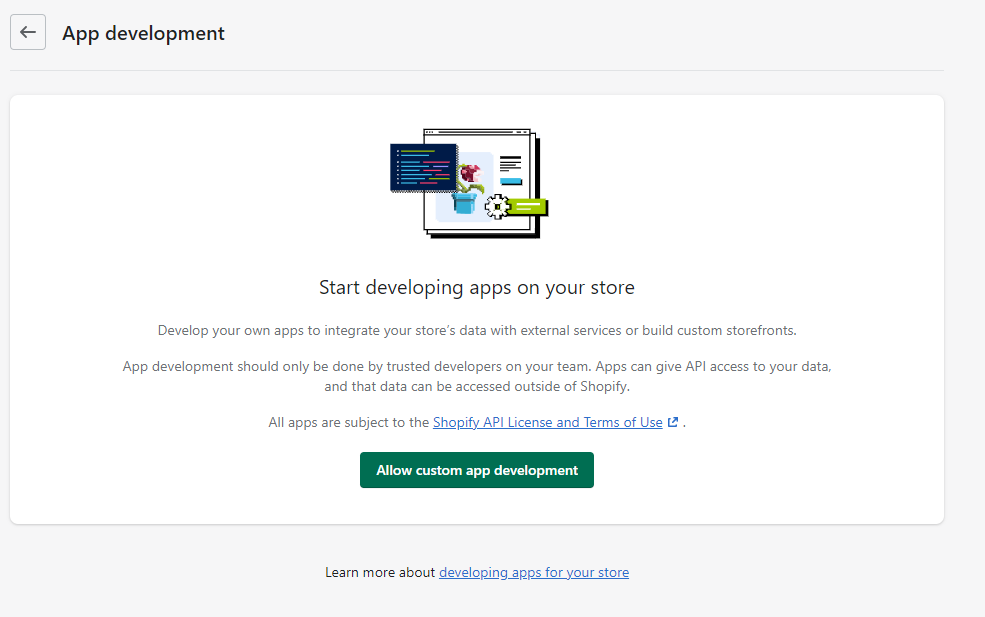
- (New& Old UI ) Click on Create an App. You can name it anything. (For Eg: GSheet)

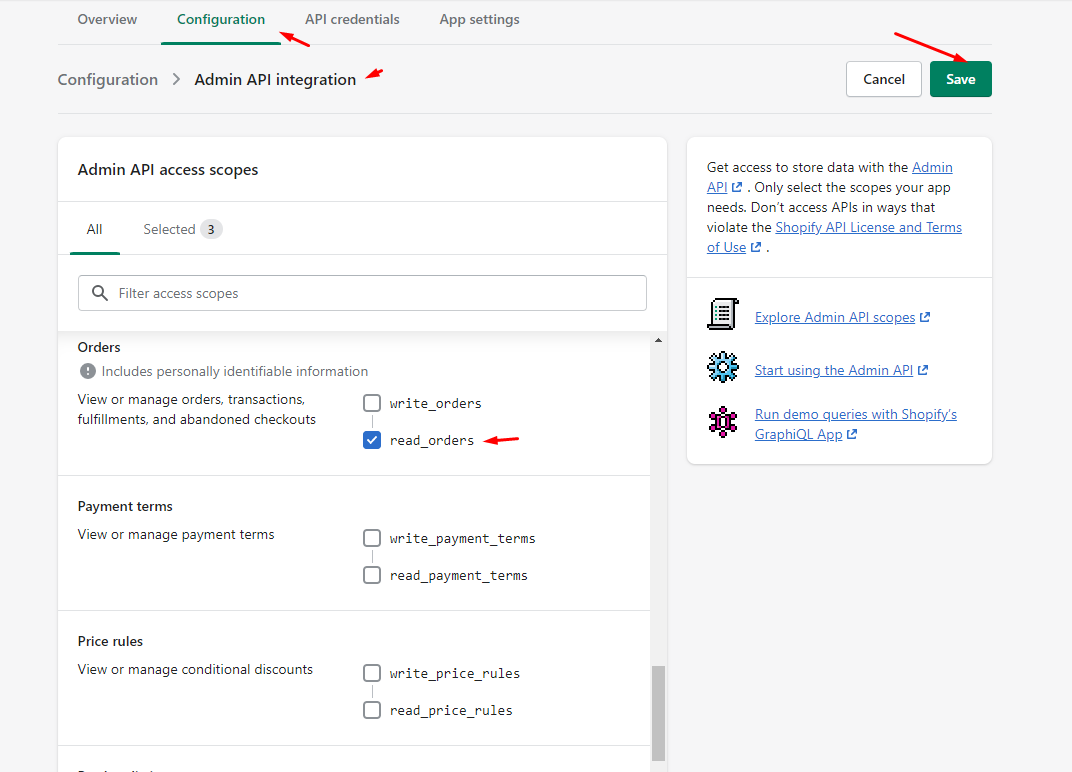
Step 2: Set Admin API access scopes
- Once you have created an App, go to Overview > Admin API Integration. Here you can select Admin API access scopes. You can include the following scopes: read_orders, read_products & read_customers. (You can include other scopes too as per your use case).
- Click on Save.
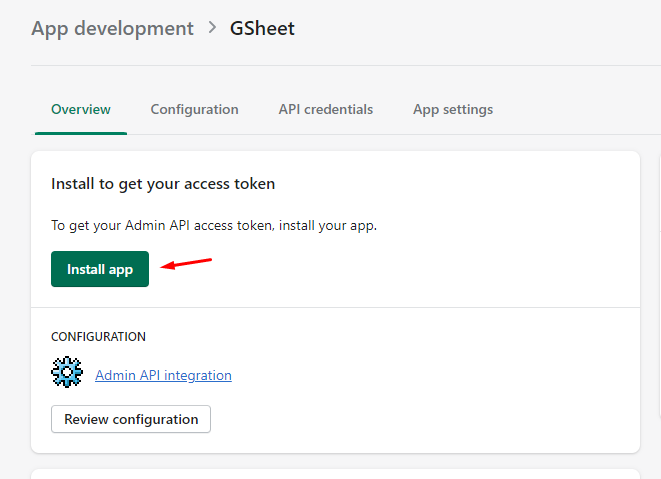
Step 3: Get the Admin API access token
- Go To Overview & click on Install App.
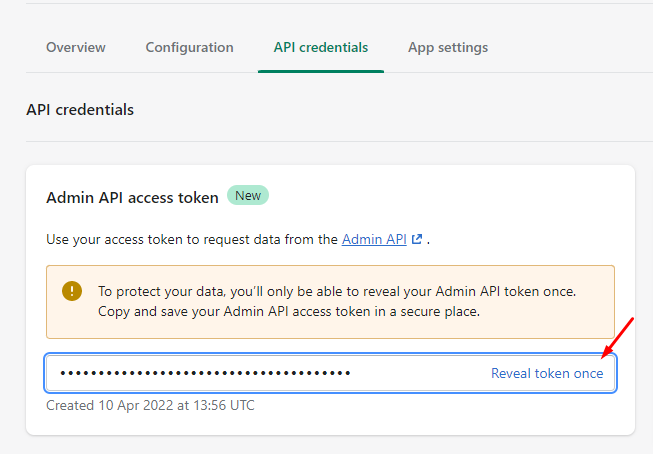
- Go to API credentials section & click Reveal token once.
- Copy the token
NOTE: If there are any changes in the Shopify UI, you can follow the steps to create a custom shopify app and get the token from here.
Custom API Method – Steps to fetch Shopify Orders data in Google Sheet
Assuming you have selected the read_orders scopes in the above steps, we’ll now import the orders data.
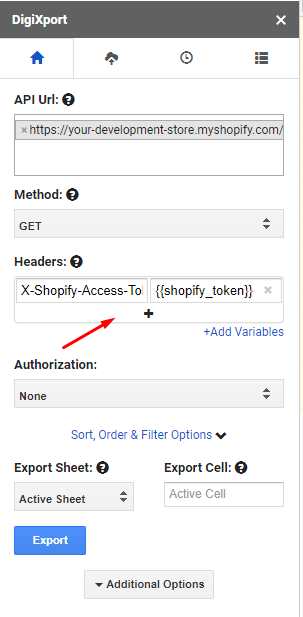
Step – 1: Setup the API Url and Authorization header
- You can enter the following URL in the API URL. Make sure to replace the {{store-name}} with your store name in the below URL.
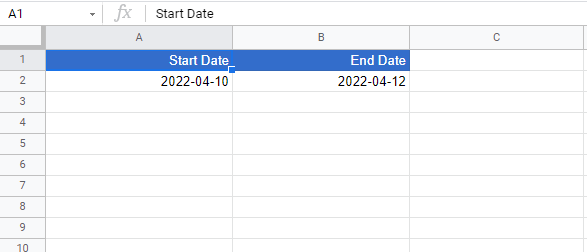
- We want orders data between a particular date range. So, we have entered the date range parameters as <<Sheet!A2>> to <<Sheet!B2>> which represents the values fetched from the sheet.
- The fields which we have included in the URL are created_at, id, name, total-price. You can check the entire list of fields at the bottom of this article.
https://{{store-name}}.myshopify.com/admin/api/2022-01/orders.json?status=any&created_at_min=<<Sheet!A2>>&created_at_max=<<Sheet!B2>>&fields=created_at,id,name,total-price&limit=200
- We’ll manual add authorization header. Open the header row and enter Key and value as “X-Shopify-Access-Token” and “{{shopify_token}}”. {{shopify_token}} is the one you copied from the last step.
Note: It is recommended to use the environment variable to store the token safely.
Step – 2: Import the data to google sheets
- Click on Export.
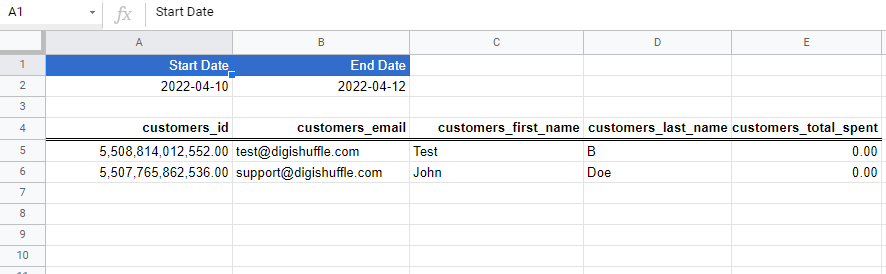
- You will see the data imported to the sheets with the fields mentioned in the URL for the date range from A2 to B2.

- To save the query, you can click the save query checkbox & then re-import the data.
Steps to fetch Shopify Customers data in Google Sheet
Most of the part is similar as we had done for importing the Orders data. You will need read_customers scope to import the customers data.
Step – 1: Setup the API Url and Authorization header
- You can enter the following URL in the API URL. Make sure to replace the {{store-name}} with your store name in the below URL.
- We want customers data between a particular date range. So, we have entered the date range parameters as <<Sheet!A2>> to <<Sheet!B2>> which represents the values fetched from the sheet.
- The fields which we have included in the URL are id, email, first_name, last_name, total_spent. You can check the entire list of fields at the bottom of this article.
https://digixport.myshopify.com/admin/api/2022-01/customers.json?status=any&created_at_min=<<Sheet!A2>>&created_at_max=<<Sheet!B2>>&fields=id,email,first_name,last_name,total_spent&limit=200
- We’ll manual add authorization header. Open the header row and enter Key and value as “X-Shopify-Access-Token” and “{{shopify_token}}”. {{shopify_token}} is the one you copied from the last step.
Note: It is recommended to use the environment variable to store the token safely.
Step – 2: Import the data to google sheets
- Click on Export.
- You will see the data imported to the sheets with the fields mentioned in the URL for the date range from A2 to B2.
- To save the query, you can click the save query checkbox & then re-import the data.
Filter/Order the columns/rows (Optional)
- You can now use the sort, order and filter options to filter the columns as per your needs.
Key Points
- It is recommended to use the “fields” parameter in the URL. If it is not included then all the fields will be imported.
- To access the nested fields in the shopify api, you can use the top level fields & then filter the columns as shown here.
- You can use the Sheet cell values to import the data with the dynamic date range. You can fetch the values of the parameters updated_at_min and updated_at_max from the google sheet. For Eg: https://your-development-store.myshopify.com/admin/api/2022-01/orders.json?updated_at_min=<<Sheet!A1>>&updated_at_max=<<Sheet!B1>>
- You can schedule the query by using dynamic dates. for Eg: You can input date range in the sheet as “=Today()-7” to “=Today()” which will import last 7 days data.
- For more information, you can check the Shopify REST admin API documentation
List of fields names for Shopify Orders API
| Field Names |
|---|
| id |
| admin_graphql_api_id |
| app_id |
| browser_ip |
| buyer_accepts_marketing |
| cancel_reason |
| cancelled_at |
| cart_token |
| checkout_id |
| checkout_token |
| client_details |
| closed_at |
| confirmed |
| contact_email |
| created_at |
| currency |
| current_subtotal_price |
| current_subtotal_price_set |
| current_total_discounts |
| current_total_discounts_set |
| current_total_duties_set |
| current_total_price |
| current_total_price_set |
| current_total_tax |
| current_total_tax_set |
| customer_locale |
| device_id |
| discount_codes |
| estimated_taxes |
| financial_status |
| fulfillment_status |
| gateway |
| landing_site |
| landing_site_ref |
| location_id |
| name |
| note |
| note_attributes |
| number |
| order_number |
| order_status_url |
| original_total_duties_set |
| payment_gateway_names |
| phone |
| presentment_currency |
| processed_at |
| processing_method |
| reference |
| referring_site |
| source_identifier |
| source_name |
| source_url |
| subtotal_price |
| subtotal_price_set |
| tags |
| tax_lines |
| taxes_included |
| test |
| token |
| total_discounts |
| total_discounts_set |
| total_line_items_price |
| total_line_items_price_set |
| total_outstanding |
| total_price |
| total_price_set |
| total_price_usd |
| total_shipping_price_set |
| total_tax |
| total_tax_set |
| total_tip_received |
| total_weight |
| updated_at |
| user_id |
| billing_address |
| customer |
| discount_applications |
| fulfillments |
| line_items |
| payment_details |
| payment_terms |
| refunds |
| shipping_address |
| shipping_lines |
List of fields names for Shopify Customers API
| Field Names |
|---|
| id |
| accepts_marketing |
| created_at |
| updated_at |
| first_name |
| last_name |
| orders_count |
| state |
| total_spent |
| last_order_id |
| note |
| verified_email |
| multipass_identifier |
| tax_exempt |
| phone |
| tags |
| last_order_name |
| currency |
| addresses |
| accepts_marketing_updated_at |
| marketing_opt_in_level |
| tax_exemptions |
| sms_marketing_consent |
| admin_graphql_api_id |
| default_address |