Last Updated on October 8, 2020 by Ritwik B
Custom Dimensions & Metrics are one of the most powerful features in Google Analytics. They’ll allow you to see in-depth insights about your users & website. They are mostly used by advanced GA users but no worries…
In this article, we’ll focus on only on custom dimensions. Also, if its totally new to you or you have some implementation issues, then you’ll get an in-depth understanding of the concept & the setup process for your own website in no time. So let’s begin…
Index
What is
To understand what is a custom dimension, let’s first understand “WHAT IS DIMENSION” in google analytics.
As Avinash Kaushik puts it
A Dimension is an “ATTRIBUTE” of the visitor to your website.

So dimension can be anything related to the website user like
- City
- Device
- Traffic Source
- Search Term
- Count of Session
- Browser
- Demographics (Age/Gender)
- etc, etc
By DEFAULT, there are around 100+ default dimension available in google analytics. You can check the whole list of dimension & metrics here.
Below is an example of the “default dimension & metrics” in google analytics which you might have already seen.

So, you might ask if there are already so many dimensions in built-into Google Analytics, then why do we need more dimensions. ?? That’s exactly why custom dimensions were introduced.
As per google docs,
Custom Dimensions & Metrics are like default dimensions and metrics in your Analytics account, except you create them yourself. You can use them to collect and analyze data that Analytics doesn’t automatically track.
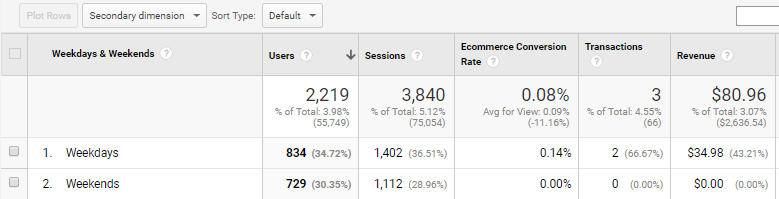
How cool will it be, if you have an ecommerce site & you are comparing transaction rate based on “Logged In” & “Logged Out” OR “Weekdays” vs “Weekend” users like below:
But there’s more…
You can define your own custom dimensions like
- Logged In Users & Logged Out Users
- Users who Comment & Users who share
- Article Author, Article Category & Article Word Count
- High Value Purchased Users, Medium Value Purchased Users, etc
- & more…
We’ll also be looking at many examples from basic to advanced in a while…
Let’s also understand the “Scope” of the dimension which is critical while implementing any custom dimension.
What are the
Every dimension in Google Analytics has a scope. It also defines how all the reports are processed. Custom dimensions currently has 4 scopes:
- Hit level
- Session level
- User level
- Product level
By selecting a “Scope”, you are telling google analytics on how to process a certain “custom dimension” value for reporting. Let’s take a look at a few real-world examples.
Example #1:
Let’s say, you want to define a custom dimension as “Article Author“, so whenever the user reads an article by, say Author-X, the pageview hit should contain the custom dimension information like the Author Name (Author X). So the Scope for “Article Author” will be “Hit-Level” Scope.
Example #2:
Now, you define a custom dimension as “Weekday & Weekends“, so whenever the user initiates the sessions on Mon-Fri, we will send all the hits in the session with custom dimension information like “Weekday“. So the Scope for “Weekday & Weekends” will be “Session-Level“.
Example #3:
Say, you define a custom dimension as “User Purchase Value“, so whenever the user makes a transaction of 500$, we will send all the subsequent hits for that user with custom dimension information like “$500-$1000 purchasers”. So the Scope for “User Purchase Value” will be “User-Level“.
Example #4:
Say, you define a custom dimension as “Product Color“, so whenever the user views or purchases a product with color “blue”, you will send the hit with product level custom dimension value as “blue”. So the Scope for “Product Color” will be “Product-Level“.
How To Setup Custom Dimensions in Google Analytics?
You can set up custom dimensions via the following methods
- Google Tag Manager
- Google Analytics (gtag.js or analytics.js)
- Google Analytics Data Import
Let’s first go through the initial setup in the google analytics.
Step - 1: Create a Custom Dimension in Google Analytics with the relevant scope
Go to your Property Settings > Create a custom dimension.
You can create one & name it. (You can change the name later & it will not affect the past data)

Note down the “Index” number, cause we’ll be using the same while setting up the code.
IMPORTANT: You cannot delete the custom dimension once created.
Step - 2: Place the Custom Dimension code via Google Tag Manager
GTM is the easiest way to track custom dimension, as it is also scalable across different analytics platforms. To get started, make sure GTM is properly installed on your website.
Step – 1:
Firstly, create a variable tag in GTM to capture the custom dimension value. You can capture it via dataLayer object or other methods available in variable creation in GTM.
Step – 2:
Once, you define the variable, create an Analytics Event tag > Go to more settings > Custom Dimension.
If you can’t find “More Settings” in Google Analytics Tag, you’ll have to go to Variables > Google Analytics Settings. (& then input the settings below)
Now, make sure you put the right index number which you got in the last step.
Now, assign the dimension value to the respective custom dimension’s index numbers.
As per our last example, I would implement the dataLayer code to pass the values & capture them via {{Author Name}} & {{Article Category}} variable in GTM.
dataLayer.push({‘event’:’articleInfoEvent’,’author_name’:'{{value1}}’,’article category’:'{{value2}}’})
Below would be the analytics event tag configuration

Step – 3
Lastly, assign a relevant trigger based on when you want to send the custom dimension data. As per our last example, I will assign event trigger fired via the dataLayer object. (eg: Event:articleInfoEvent)
Step - 2: Place the Custom Dimension code via Google Analytics (gtag.js or analytics.js)
If you want don’t want to install the GTM & directly use the GA code then here’s how you can do it…
First, you’ll need to check the analytics version if its gtag.js or analytics.js. You can find it via matching the below code with your website’s source code.
Note: If you are using ga.js, you’ll need to migrate to gtag.js.

Global site tag (gtag.js) Implementation
If you are using gtag.js to implement custom dimension, you’ll need to follow these 2 steps to fire the code
- Map value to Google Analytics parameter
- Send value using the same parameter
Confusing?? Not Really. Let’s go step by step…
First, you’ll need to modify the code line (marked in red below)…..
<!– Global site tag (gtag.js) – Google Analytics –>
<script async src=”https://www.googletagmanager.com/gtag/js?id=UA-48892814-1″></script>
<script>
window.dataLayer = window.dataLayer || [];
function gtag(){dataLayer.push(arguments);}
gtag(‘js’, new Date());
gtag(‘config’, ‘UA-XXXXXXXX-X’);
</script>
TO
<!– Global site tag (gtag.js) – Google Analytics –>
<script async src=”https://www.googletagmanager.com/gtag/js?id=UA-48892814-1″></script>
<script>
window.dataLayer = window.dataLayer || [];
function gtag(){dataLayer.push(arguments);}
gtag(‘js’, new Date());
gtag(‘config’, ‘UA-XXXXXXXX-X’, {‘custom_map’: {‘dimension<Index>’: ‘dimension_name’}});
</script>
Now, you’ll need to fire event tag with the custom dimension information.
gtag(‘event’, ‘event_action_name’, {‘dimension_name’: dimension_value});
If you are unsure about the syntax for gtag.js event tag, check the gtag docs.
The trigger for the event can be anything depending on what value you are sending to the defined custom dimension.
So let’s say, to pass the “Author Name” custom dimension (with index 1), we will use the below code
Sending Single Custom Dimension:
// Maps ‘dimension1’ to ‘author_name’.
gtag(‘config’, ‘GA_TRACKING_ID’, {
‘custom_map’: {‘dimension1’: ‘author_name’}
});
// Sends an event that passes ‘author_name’ as a parameter. (Trigger: pageview)
gtag(‘event’, ‘article_view’, {‘author_name’: ‘Ritwik B’});
Sending Multiple Custom Dimensions:
You can even send multiple custom dimensions by adding an additional parameter. Say, in the previous example we also want to pass article category.
// Maps ‘dimension1’ to ‘author_name’ & ‘dimension2’ to ‘article_category’ .
gtag(‘config’, ‘GA_TRACKING_ID’, {
‘custom_map’: {‘dimension1’: ‘author_name’,’dimension2′:’article_category’}
});
// Sends an event that passes ‘author_name’ & ‘article_category’ as a parameter. (Trigger: pageview)
gtag(‘event’, ‘article_view’, {‘author_name’: ‘Ritwik B’,’article_category’:’SEO’});
Now,let’s move onto analytics.js
Universal Analytics (analytics.js) implementation
Personally, I find it easy to implement custom dimension on analytics.js as compared to gtag.js. In Universal Analytics, you just need to add one additional object when firing the event hit. (as shown below)
ga(‘send’, ‘event’, ‘category’, ‘action’, {
‘dimension1’: ‘dimension_value’
});
You can even send it via pageview hit using the below syntax.
ga(‘send’, ‘pageview’, {
‘dimension1’: ‘dimension_value’
});
So if you need to pass author_name & article_category, just send 2 values to respective dimension in the same object. (as below)
ga(‘send’, ‘pageview’, {
‘dimension1’: ‘Ritwik B’,
‘dimension2’: ‘SEO’
});
If you want to pass the custom dimension value for every hit on the page (or with the tracker object), you can use “set” command.
ga(‘set’, { ‘dimension5’: ‘custom dimension data’, ‘metric5’: ‘custom metric data’ });
So, with our previous example it will look like.
ga(‘set’, {
‘dimension1’: ‘Ritwik B’,
‘dimension2’: ‘SEO’
});
ga(‘send’, ‘pageview’);
Step - 2: Populate Custom Dimension via Google Analytics Data Import Feature
The very… very… rarely used feature in google analytics is data import. It is powerful & will help you-
- Reduce Coding headaches
- Reduce Hit size
Yes, you don’t need to edit any code here…
Just upload a CSV file & map the custom dimensions. Let’s get straight to an example…
Say, you want to create 2 custom dimensions “Article Category” & “Article Author” and the URL structure is kind of like “example.com/blog/seo/what-is-seo”
Step – 1:
You can create custom dimension “Article Category” & “Article Author” with hit-level scope.
Step – 2
Then, create a data upload with “content data” upload type
Step – 3
Use page path as schema key & map it to the custom dimension which you created in step 1.

Step – 4:
Upload the data in CSV format or you can use “DigiXport” add-on to upload data from a spreadsheet to google analytics. (image below)
Here’s the thorough example by google

Which Reports Reflect The Custom Dimensions Data?
Custom dimensions are available in following reports
- Default reports in Google Analytics (as a secondary dimension)
- Custom Reports (as a primary/secondary dimension)
- Google Analytics Reporting APIs (as ga:dimension<index>)
Note: Not all dimensions & metrics are compatible with each other as it depends on their scope.
Default reports in Google Analytics (as a secondary dimension)
You can use the secondary dimension drop-down to view the custom dimensions.

Custom Reports (as primary/secondary dimension)
You can even create custom reports where you can add custom dimension as primary with all other relevant metrics. You can use
- Flat Table
- Explorer
as shown below

Google Analytics Reporting APIs
Lastly, If you use APIs to extract GA data, you can use the dimension field as “ga:dimension<index>”. So as per our last example article author will be representated as ga:dimension1.
What are the limitations of Custom Dimensions?
Some of the limitations of the custom dimensions are
- Only 20 Custom dimension can be created per analytics property. If you have Google Analytics 360 account, then the limit is 200 custom dimensions per property,
- Custom dimensions once created CANNOT be deleted. They can only be made inactive. Also, you can reuse the old custom dimension by changing its scope, value & name, but it is NOT recommended.
- Custom dimensions are only available for universal analytics (analytics.js) & global site tag (gtag.js).
Learn more about the limitations here.
Some Awesome Custom Dimension Examples To Get Started
1. ) Purchasers/Leads (User Level Scope)
Personally, I prefer to create this one on most of the industries. Once someone purchases your product or submits a lead, you can assign a custom dimension as “Yes” or “No” or better way I prefer is to put the users in most recent purchase value bucket as
- $1 – $500
- $500 – $1000
- $1000 – $5000
- $5000+
So when someone transacts within the $500 – $1000 range, send the custom dimension value as “$500-$1000” & so on…
You can do the same with Leads & assign a lead value bucket.
2.) Engagement – Shares, Comments (User Level Scope)
When someone shares or comments on your blog post, fire the hit with custom dimension value as “Sharers” or “Commentors” or “Non-Engaged”.
You can then analyze the behavior of these 3 different cohorts.
3.) Subscribers (User Level Scope)
You can track “subscribers” custom dimension with the value “yes” & “no” to see which one performs the best. Simply trigger it when the user subscribes to your newsletter.
4.) Logged In Status (Session Level Scope)
If your site has login functionality, you can use this to analyze the behavior of 2 different types of users. You can fire the custom dimension value when someone logs in & out.
5.) Weekday & Weekend (Session Level Scope)
If you want to see the trends for the weekday & weekends, you can send the value as “weekday” or “weekend”. You can create a custom dimension with session level scope.
6.) Seasons (Session Level Scope)
This is similar to the last custom dimension. Here, you can send different season value “winter”, “summer”. etc for in-depth analysis of the seasonality.
7.) Article Author (Hit Level Scope)
If you have a blog site with various authors, then you can pass the name of the author as custom dimension when someone views the article.
This will allow you to see the engagement on different article writers.
8.) Article Category (Hit Level Scope)
If you have different categories in the blog, you can pass the category name as a custom dimensions to see which category gets more engagement
9.) Article Count (Hit Level Scope)
You can create word count buckets & pass that as custom dimension to see how users engage with your content based on your article word count. Here’s an example:
- >500
- 500-1000
- 1000-2000
- 2000+
10.) Product Size Or Color (Product Level Scope)
You can send additional features like Product size or color as custom dimension value. It can help you analyze your website users more in-depth based on which ones are viewed the most, or added to cart & so on…
11.) Product Size Or Color (Product Level Scope)
You can send additional features like Product size or color as custom dimension value. It can help you analyze your website users more in-depth based on which ones are viewed the most, or added to cart & so on…
12.) Product Availability (Product Level Scope)
You can send values like “In stock”, “out of stock” & so on… to analyze which products are viewed or added to cart the most, which will help you stock the right products.
13.) Product Margin (Product Level Scope)
You can calculate the product margin & send it as a custom dimension. It will help you analyze the ROI for the different campaigns & more…
Conclusion & Final Thoughts
Custom dimensions are powerful & they’ll take your analysis to the next steps. Things you should do before creating a custom dimension is plan out the things.
Identify your business industry/category & decide which dimension might help you uncover more insights. It shouldn’t be a generic dimension but a very specific one.
If you want to overcome the custom dimension limit, you can concatenate the values sent during a single hit.
For Eg: “value1_value2_value3….”.
And lastly. do comment which custom dimensions have you implemented or issues faced during the implementation. 🙂
Ritwik is a product owner at DigiXport. He also loves to write technical & easy to understand blogs for Marketers & Entrepreneurs. A Firm Believer in Teaching -> Learning -> Growing. :)