Last Updated on April 22, 2019 by Ritwik B
We’ll be looking at tracking Infusionsoft order forms via e-commerce tracking feature of google analytics.
GTM would be used for the setup process.
Here are some important prerequisites:
- Make sure analytics tracking is turned on in View > E-commerce settings
- GTM Code is installed on all pages of the site.
Here’s what you’ll get
- E-commerce Transaction Data in Google Analytics
- No Duplicate Tracking of order IDs
The code to prevent duplicate tracking was inspired from here.
You’ll be ready in no time. Just follow these 3 simple steps:
- Infusionsoft E-commerce Tracking Code Setup in GTM
- Google Analytics E-commerce Tracking Tag
- Infusionsoft Order Form Setup
Infusionsoft E-commerce Tracking Code Setup in GTM
- Create Custom Variables of type URL > Select Query & type ‘orderId’.

- Create a new Custom HTML tag & paste the following code.
<script>
function captureOrder(){
window.dataLayer = window.dataLayer || []
var d=[];
var t = 0
var productName=/productName=([^&]+)/i.exec(location.search)[1].split(',');
var price=/price=([^&]+)/i.exec(location.search)[1].split(',')
var orderId = /orderId=([^&]+)/i.exec(location.search)[1]

if(productName.length != price.length) { return false }

for(var i=0;i<productName.length;i++)
{
d.push({
       'sku': '100' +"-"+productName[i],
       'name': productName[i] ,
       'price': parseFloat(price[i]),
       'quantity': 1
   })
t+=parseFloat(price[i])
}

  dataLayer.push({
  'transactionId' : orderId,
  'transactionTotal' : t,
  'transactionProducts' : d,
  'event' : 'transaction_success'

  })

  }


		var orderID = /orderID=([^&]+)/i.exec(location.search)[1];
		if(document.cookie.indexOf('orderIds')>-1){
 			var trackedOrderIds = /orderIds=([^;]+)/g.exec(document.cookie)[1].split("|");
   			if(trackedOrderIds.indexOf(orderID)==-1){
          		captureOrder();
                trackedOrderIds.push(orderID);
				var d = new Date();
    			d.setTime(d.getTime() + (180*24*60*60*1000));
    			var expires = "expires="+d.toUTCString();
    			document.cookie = "orderIds=" + trackedOrderIds.join('|') + "; " + expires;


            }
		}else{
      		captureOrder();
                var trackedOrderIds = [];
      		trackedOrderIds.push(orderID);
  			var d = new Date();
    		d.setTime(d.getTime() + (180*24*60*60*1000));
    		var expires = "expires="+d.toUTCString();
    		document.cookie = "orderIds=" + trackedOrderIds.join('|') + "; " + expires;
		}
</script>
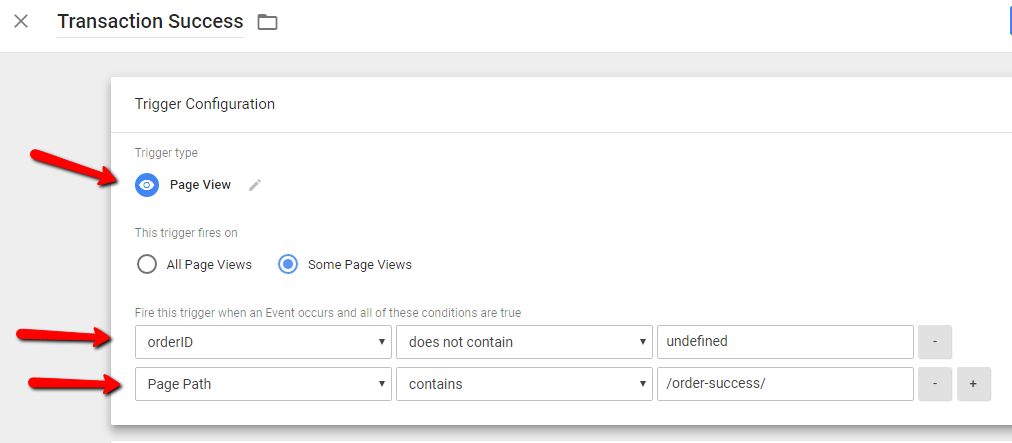
- Create a Trigger with the following configuration:
(Make sure to enter the correct Thank you page URL by replacing the “/order-success/”)
Google Analytics E-commerce Tracking Tag
- Create Google Analytics Tag with Type ‘Transaction’.
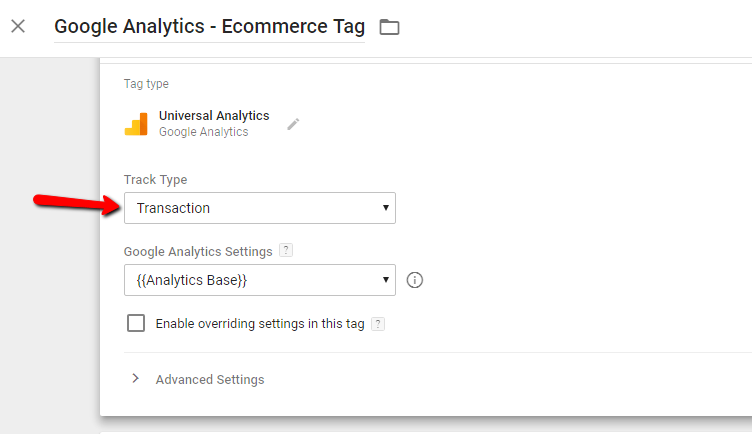
- Trigger the above tag with a custom event named ‘transaction_success‘.
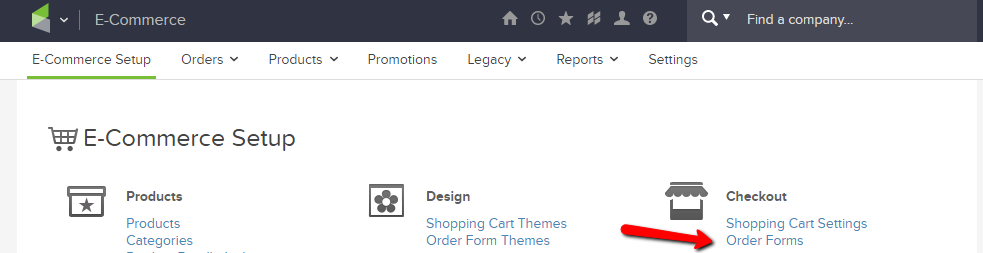
Infusionsoft Order Form Setup
- Go To E-commerce > E-commerce Setup > Order Forms.
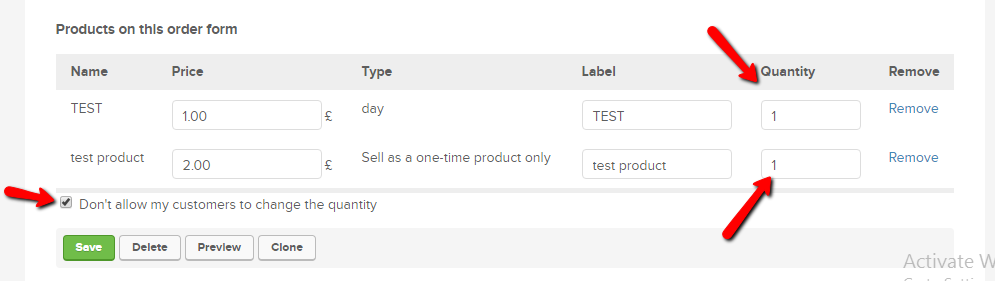
- Create an order form or open the once created.
- Here, you can include any number of products. The only thing to check here is quantity should be 1 for each product & user should not be able to change the quantity.
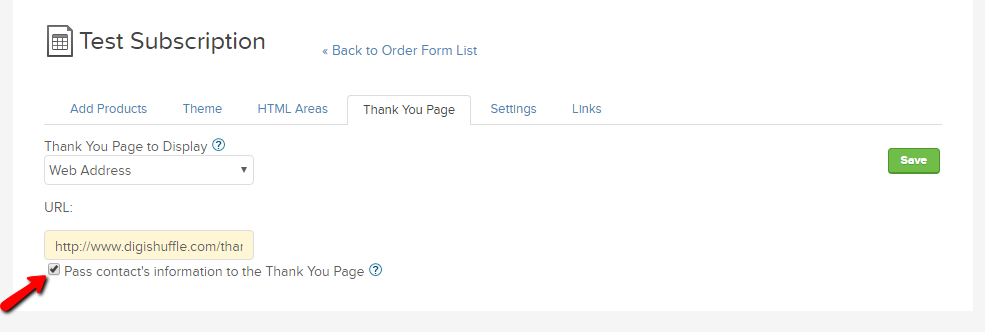
- In Thank you page tab, make sure to use the thankyou page on your domain.
- Now most important part. When you paste your thankyou page URL, include the ‘productName‘ & ‘price’ parameter.
Eg: If you have a single product ‘ProductA’ for price 100.
Thankyou Page URL: www.xyz.com/order-success/?productName=ProductA&price=100Eg: If you have 2 products ‘ProductA’ & ‘ProductB’ for price 100 & 120 respectively.
Thankyou Page URL: www.xyz.com/order-success/?productName=ProductA,ProductB&price=100,120
& so on….. - You can replace the ‘ProductA’& ‘ProductB’ with any name you like. The same will appear as the product name in google analytics.
- Lastly, check the option “Pass contact’s information to the Thank You Page”.
Summary
- Make sure you have products with the single quantity which cannot be changed by users.
- Also, in Google Analytics, the e-commerce settings in the view should be turned on.
- You should use the Thankyou page URL on your domain instead of infusionsoft’s.
Let me know if you implement it successfully or face any issues.
Other useful articles:
Automated Cost Data Import – Facebook To Google Analytics
Power Of Segments in Google Analytics
10 Powerful Facebook Custom Events for Remarketing – Google Tag Manager
Adwords CPA Scanner – Analyze & Reduce High CPAs in Seconds.
Ritwik is a product owner at DigiXport. He also loves to write technical & easy to understand blogs for Marketers & Entrepreneurs. A Firm Believer in Teaching -> Learning -> Growing. :)
Thanks for the useful article! How do I install the GTM code on Infusionsoft order forms?