Last Updated on September 29, 2019 by Ritwik B
I’ll be showing you the step by step method to track various Facebook Custom Events. You can use it to
- Build Remarketing List (Custom Audiences)
- Defining Conversions
But Wait…
It is highly recommended to set up a facebook base pixel the proper way.
If you are not confident about the Base pixel setup, check How To Set Up Facebook Base Pixel.
If you’re done with that, let’s proceed.
Here is the list of events, we’ll be tracking:
- Outbound Link
- Internal Links
- File Download Links (PDF/CSV/MP3, etc)
- Button Clicks
- Image Clicks
- Image Hovers
- Form Submits
- Scroll Tracking
- Time On Page
- Pages / Visits
- User Lifetime Value
- Pageviews / User
- Element Visibility
- User’s First Visit: Source, Medium, Campaign, Landing Page, Acquisition Date/Month & More..(First Attribution).
- User’s Last (Recent) Visit: Source, Medium, Campaign, Landing Page, Acquisition Date/Month & More..(Last Attribution).
- Video Tracking
16 Facebook Events To Build Custom Audiences & Define Conversions
1.) OutBound Links
The steps below would be used in setting up most of the events.
Step #1 – Input Custom HTML Code
- Go To Google Tag Manager
- Create a Custom HTML Tag & paste
<script>fbq('trackCustom','Link Clicks',{'name':{{Click URL}},'page':{{Page URL}}})</script>
- The Event Name is ‘Link Clicks’ & it has two parameters
- name: The URL of the link clicked.
- page: The pages on which the link was clicked
- These parameters are optional & you are free to include/exclude it.
Step #2 – Tag Sequencing
- Go To Advanced settings > Tag Sequencing > Check Fire A Tag Before Current Tag & then include your Facebook Base Code Pixel.
Thi is the Important Step as facebook base code tag initializes the tracker ‘fbq’, which is needed to send the event hit data to facebook servers.
![]()
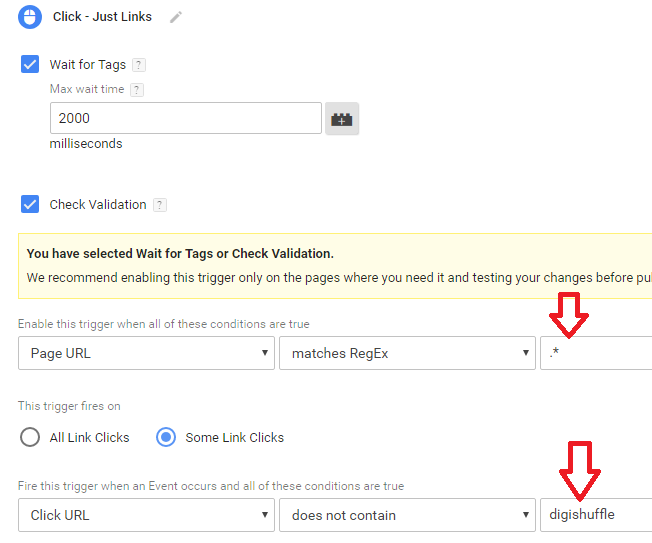
Step #3 – Setup Triggers
- Set Trigger Type as Clicks – Just Links & Fire on Click URL does not contain ‘www.your-domain.name.com’.
- If you select Wait for Tags or Check Validation, enter Page URL matches regex .*.
Step #4 – Verify The Setup
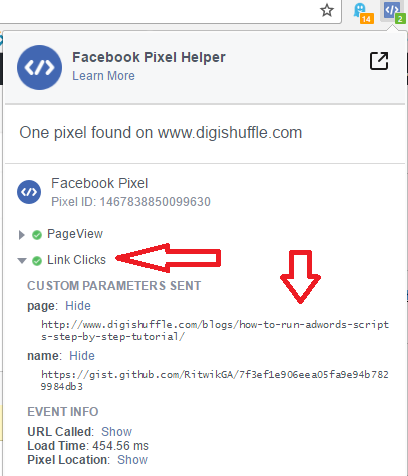
- Verify if the event is setup correctly through Facebook Pixel Helper.
- Click on the link & check the ‘Event’ & ‘name’. (Here, I am tracking outbound github links)
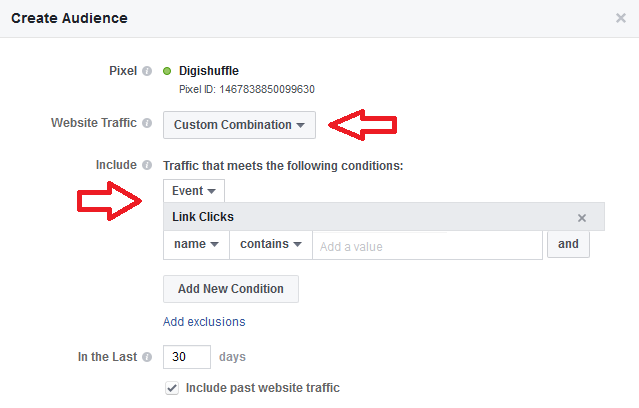
Step #5 – Create Custom Conversions & Custom Audiences
- Go To your Facebook Pixel Page.
- Click on
- Create Audience or
- Create Custom Conversions > Track Custom Conversions
- You can define conversions by selecting the Event ‘Link Click’ & then combination of parameters.
- Eg: Link Clicks on xyz page, xyz link click on all pages, etc
- You can follow the similar method for Creating Audiences in facebook.
A Better Way would be to track All Links through GTM & then filter it out in Facebook while defining conversion or building audiences
2.) Internal Links
- Create a Custom HTML Tag & paste
<script>fbq('trackCustom','Internal Link Clicks',{'name':{{Click URL}},'page':{{Page URL}}})</script>
- Implement Tag Sequencing.
- You can create a new trigger with following conditions. (replace with your domain)

- Here, you can also track links to custom domains.
- For Eg: To track all Github links on your website, just enter {{Click URL}} contains Github, etc
- Verify The Pixel Setup.
- Create Audience & Custom Conversions.
3.) File Download Links
- Create a Custom HTML Tag & paste
<script>fbq('trackCustom','File Downloads',{'name':{{Click URL}},'page':{{Page URL}}})</script>
- Implement Tag Sequencing.
- In this case, we’ll use the regex match trigger in Click URL.
- Following is the list of regex you can use to trigger particular file format
- PDF file —> .pdf$
- CSV file —> .csv$
- PNG file —-> .png$
- xlsx file —> .xlsx$
- and so on…
- If you want two or more files to match you can use
- PDF & CSV files —> .pdf$|.csv$
- PDF, CSV, PNG files —> .pdf$|.csv$|.png$
- and so on..

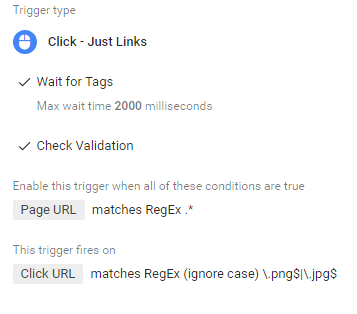
4.) Image Clicks
- Create a Custom HTML Tag & paste
<script>fbq('trackCustom','Image Clicks',{'name':{{Click URL}},'page':{{Page URL}}})</script>
- Implement Tag Sequencing.
- Change Click URL trigger to match image format like png, jpg, jpeg, etc.
- Use regex condition to add more formats .png$|.jpg$|.jpeg$ & so on…
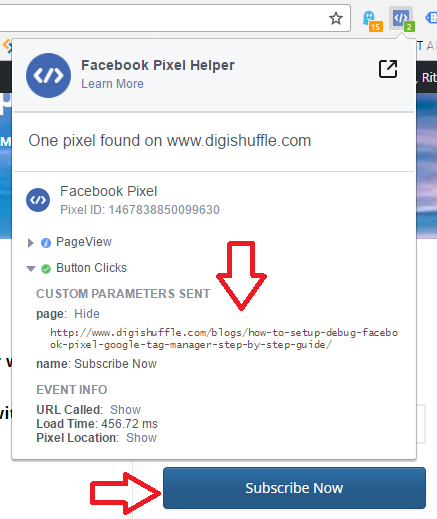
5.) Button Clicks
- Create a Custom HTML Tag & paste.
<script>fbq('trackCustom','Button Clicks',{'name':{{Click Text}},'page':{{Page URL}}})</script>
- There are 2 parameters (optional)
- name – The button text.
- page – The page on which the button was clicked
- Implement Tag Sequencing.
- Create a Variable in GTM. (isButtonClicked) Paste the code.
function () {
var el={{Click Element}}
if (el.tagName === 'BUTTON')
        return true;
while (el.parentNode) {
 el = el.parentNode;
if (el.tagName === 'BUTTON')
        return true;
}
   return false;
}
- Create the trigger Some Clicks & set isButtonClicked to true.

- Preview the container & check the facebook pixel helper by clicking a button.
6.) Image Hovers
- Create a custom tag & paste the following code.
- Insert CSS_selector, Timer, NAME-OF-IMAGE
var CSS_SELECTOR=''    //Insert CSS Selector
var TIMER= 2000        //Insert hover timing
var TRACKER=function (){fbq('trackCustom','Image Hover',{'name':'NAME-OF-IMAGE','page':{{Page URL}}})} //Insert name of image
function hoverElement(elem, callback, timer) {
    var timeout = null;
    document.querySelectorAll(CSS_SELECTOR)[0].onmouseover = function() {
        timeout = setTimeout(callback, timer);
    };
    document.querySelectorAll(CSS_SELECTOR)[0].onmouseout = function() {
        clearTimeout(timeout);
    }
};
- To find CSS Selector, press Ctrl+Shift+C > Right click on Img element tag > select copy selector.
![]()
- Implement Tag Sequencing.
- Trigger on All Pages
- Verify The Pixel Setup.
- Create Audience & Custom Conversions.
7.) Form Submits
- Create a Custom HTML Tag & paste.
<script>fbq('trackCustom','Form Submit',{'name':'NAME_OF_THE_FORM','page':{{Page URL}}})</script>
- Replace NAME_OF_THE_FORM with the custom name.
- Implement Tag Sequencing.
- Create a Form submit trigger & fire on all pages.
- If you want to track a particular form on the particular page, you can then use page URL contains /contact-us or form ID contains xyz, etc.
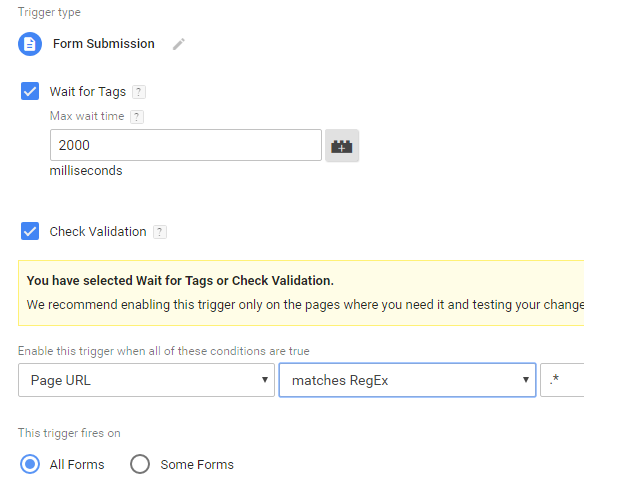
- IMP: The GTM form listens for ‘submit’ event of the form & will not fire it form uses Ajax, XMLHttpRequests ,etc functionalities.
- You can then implement the custom tag code in Ajax or form submit callback functions.
- Verify The Pixel Setup.
- Create Audience & Custom Conversions.
Check here for the [NEW]updated guide:
Mega Guide To Track [All]Form Submissions in Google & Facebook Analytics
8.) Scroll Tracking
- Copy & Paste the Scroll Tracking Script (Jquery Version) (or use Non-Jquery Version) in Custom HTML tag & Trigger it on all pages.
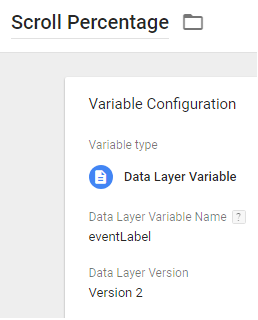
- Create two data Layer variable {{Scroll Percentage}} & {{Scroll Timings}}.
![]()
- Create an another Custom HTML Tag & paste.
<script>fbq('trackCustom','Scroll Tracking',{'Scroll Depth':{{Scroll Percentage}},
'Scroll Time':{{Scroll Timings}},'page':{{Page URL}}})</script>
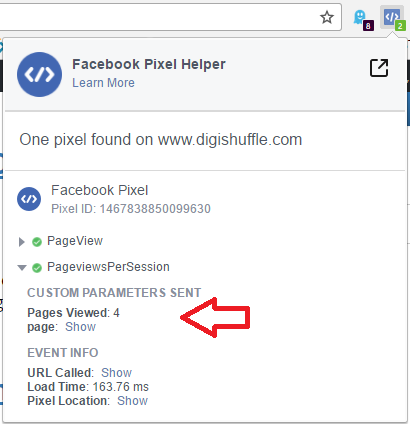
- Here, I have named the event as Scroll Tracking & included the parameters
- Scroll Depth: What is the %Scroll of a page
- Scroll Time: What is the time taken by user to scroll to specified %
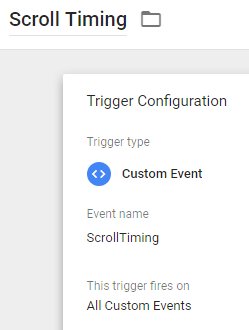
- Implement Tag Sequencing.
- Trigger on event ScrollTiming.
- Verify the Event using the plugin
![]()
- Create Audience & Custom Conversions.
Eg: Users who spend X sec on Page & Scrolled 100%, etc
9.) Time On Page
- Copy & Paste the Time on Visible & Hidden Page script in Custom HTML tag & Trigger it on all pages.
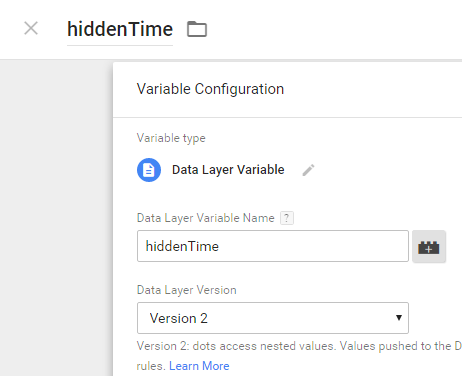
- Create a GTM variable visibleTime & hiddenTime.

- Create an another Custom HTML Tag & paste.
<script>fbq('trackCustom','Time On Page',{'Page Visible Time':{{visibleTime}},
'Page Hidden Time':{{hiddenTime}},'page':{{Page URL}}})</script>
- Here, the name of Event is Time On Page & included the parameters
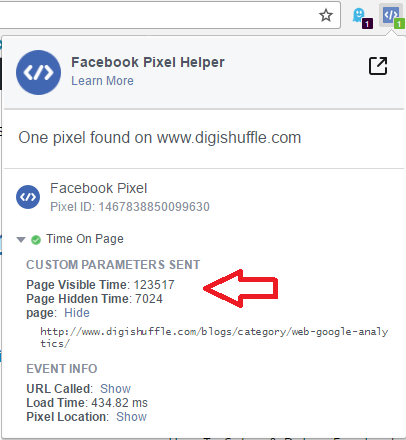
- Page Visible Time: Time for which your web page was visible in the browser tab.
- Page Hidden Time: Time for which your web page was hidden in the browser tab.
- Trigger the above Custom HTML tag with ‘sendTimings’ custom event.
- Implement Tag Sequencing.
- Verify the tag using the pixel helper plugin
- You can then Create Conversions & Build Audiences using these parameters.
Eg: Users who visibletime is X sec on Page Y & so on. - Create Audience & Custom Conversions.
10.) Pages / Sessions
- Create a GTM variable with variable type ‘1st party cookie’ & cookie name ‘pv_per_sess’.
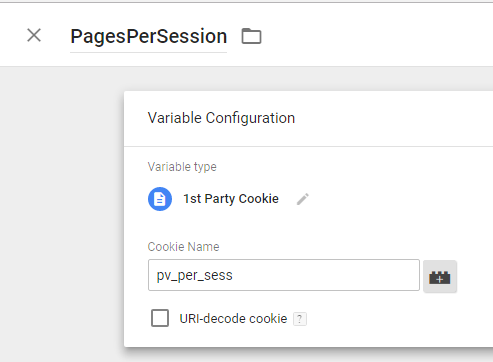
- Create a Custom HTML Tag & paste the “dgTrack.js” base code. After installing the base code make sure to paste the PageviewsPerSession event code below it. For more information check the docs.
<script>

dgTrack.pageviewCount(

{ cookie_name: 'pv_per_sess',

  callback : function(obj){

  // Insert your event tracking code here : facebook custom event example //    fbq('trackCustom','PageviewsPerSession',{

       'Pages Viewed': obj['cookieValueNew'],

       'page':location.pathname

})

}

})

</script>
- Here, the name of Event is PageviewsPerSession & included the parameters
- Pages Viewed: Number of pages viewed until the browser is closed.
- page: page viewed by the user.
- Implement Tag Sequencing.
- Verify the event through pixel helper
- Create a Custom Audience or Define Conversions based on the number of pages viewed by users.
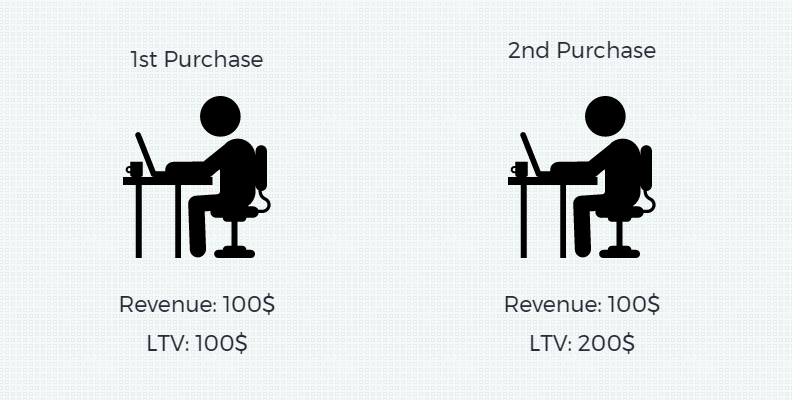
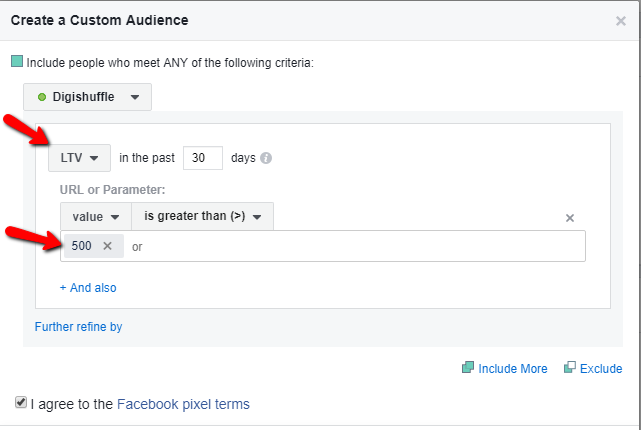
11.) User Lifetime Value (LTV)
Lifetime value is a more valuable metric if you are running an eCommerce site.
Here, we’ll first understand the tracking process behind LTV.
Let’s say…..
- A user purchases a product worth 100$.
- The cookie is stored in his browser as LTV=100$
- Later on, with the same browser, he does 2nd purchase worth 100$.
- Now, LTV becomes 200$.
Below image will summarize the things.
Step – 1 : Create Custom HTML in GTM
Create Custom HTML & paster the following code
<script>

var revenue = {{Revenue}}     // Revenue
var cookie_name = 'c_ltv'     //Name of Cookie
var cookie_duration = 365*2   //days

if(readCookie(cookie_name) == null)
{
fbq('trackCustom','LTV',{'value': parseFloat(revenue) ,'page':{{Page URL}}})
createCookie(cookie_name, revenue ,cookie_duration)
} else
{
var old_revenue = readCookie(cookie_name)
revenue = parseFloat(old_revenue) + parseFloat(revenue)
fbq('trackCustom','LTV',{'value': parseFloat(revenue) ,'page':{{Page URL}}})
eraseCookie(cookie_name)
createCookie(cookie_name, revenue , cookie_duration )
}


// Source : https://www.quirksmode.org/js/cookies.html ///
function createCookie(name,value,days) {
	if (days) {
		var date = new Date();
		date.setTime(date.getTime()+(days*24*60*60*1000));
		var expires = "; expires="+date.toGMTString();
	}
	else var expires = "";
	document.cookie = name+"="+value+expires+"; path=/";
}

function readCookie(name) {
	var nameEQ = name + "=";
	var ca = document.cookie.split(';');
	for(var i=0;i < ca.length;i++) {
		var c = ca[i];
		while (c.charAt(0)==' ') c = c.substring(1,c.length);
		if (c.indexOf(nameEQ) == 0) return c.substring(nameEQ.length,c.length);
	}
	return null;
}

function eraseCookie(name) {
	createCookie(name,"",-1);
}
</script>
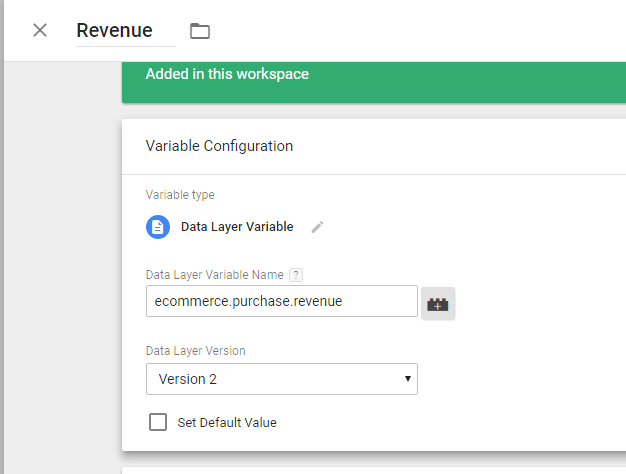
- Here, you have to populate the {{Revenue}} variable in GTM.
- Cookie name is ‘c_ltv’, you can change if you want to.
- Cookie duration is 2 years. So if the user makes the consecutive purchase within 2 yrs, the cookie will never expire.
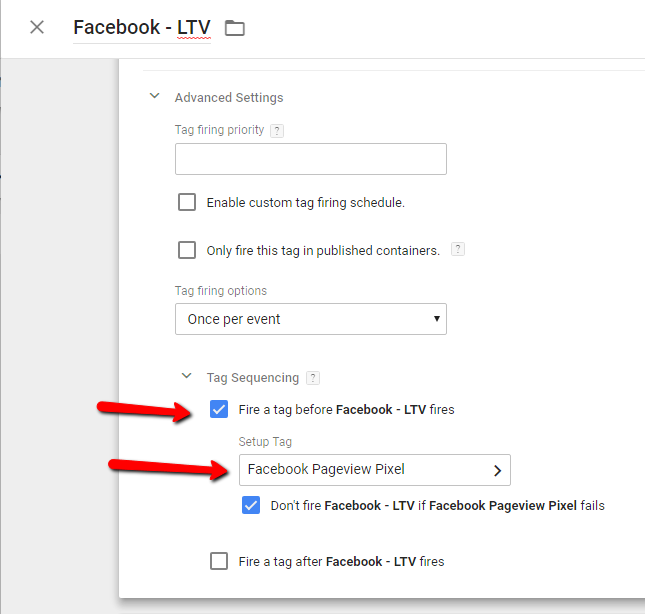
Step – 2: Implement Tag Sequencing.
‘fbq’ variable should be initialized before firing any facebook event. Make sure to fire facebook pixel tag before firing any event tag. Here is the configuration below.
Step – 3: Create a Revenue Variable
I’ll leave it open for you to create {{Revenue}} variable. You can use DataLayer, Custom Javascript, DOM element, etc.
Here’s an image if you have implemented enhanced e-commerce via dataLayer
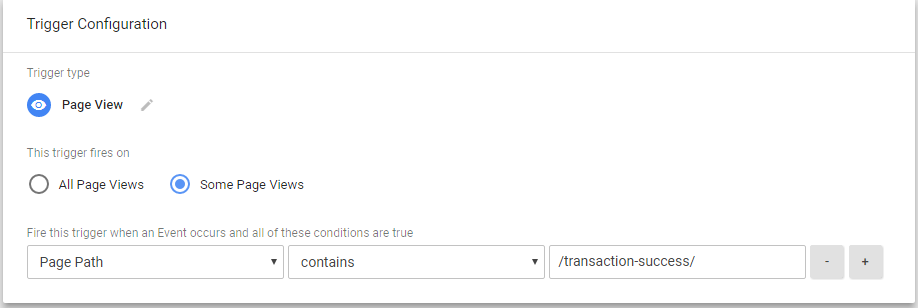
Step – 4: Create Trigger on Purchase
Fire the above custom HTML tag on success page or e-commerce transaction success event.
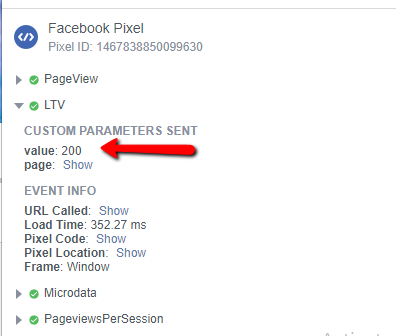
Step – 5: Verify the Tag Event
Lastly, use the facebook debugger plugin to check the event. Try test purchases & check, if the revenue gets added on.
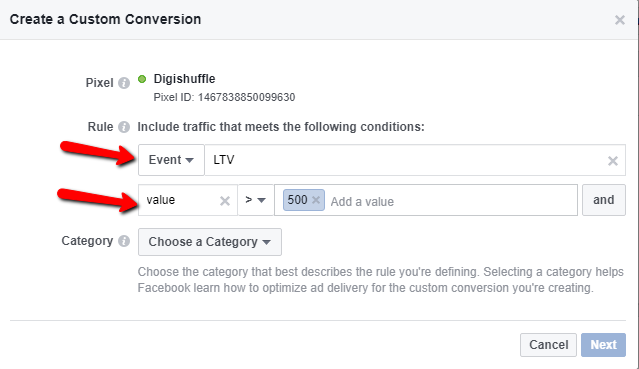
Step – 6: Create Custom Conversions or Custom Audiences
Facebook needs to collect data of the events defined before it can display it in the interface. You can check later on & define the custom conversions or custom audience as per your needs.
12.) Pageviews / User
In the past example, we saw pages/sessions event, which is a session level metric rather than user level.
Here, you can record the total pages viewed by the user in his/her lifetime.
Step – 1: Create Custom HTML in GTM
In Custom HTML Tag, Copy & Paste the “dgTrack.js” base code. Paste the code for PageviewsPerUser event below it. For more information check the docs.
<script>

dgTrack.pageviewCount({
cookie_name: 'pv_per_user',
cookie_duration: 365*2,
callback : function(obj){
// Insert your event tracking code here : facebook custom event example //
fbq('trackCustom','PageviewsPerUser',{
'Pages Viewed': obj['cookieValueNew'],
'page':location.pathname
})
}
})
</script>
Here, Cookie Duration is kept as 2 yrs. So, the cookie will never expire, if the user does a consecutive pageview within 2 yrs.
Step – 2: Implement Tag Sequencing.
Step – 3: Trigger the Above tag on All Pages.
Step – 4: Verify the Tag
You can check your facebook pixel debug plugin for the events.

13.) Element Visibility
This would be based on recent GTM update. Now you can track a DOM element visibility.
So, if you have a specific banner, form, GIF, Offer Text, etc you can track if the user viewed the element & for how long it was visible to the user.
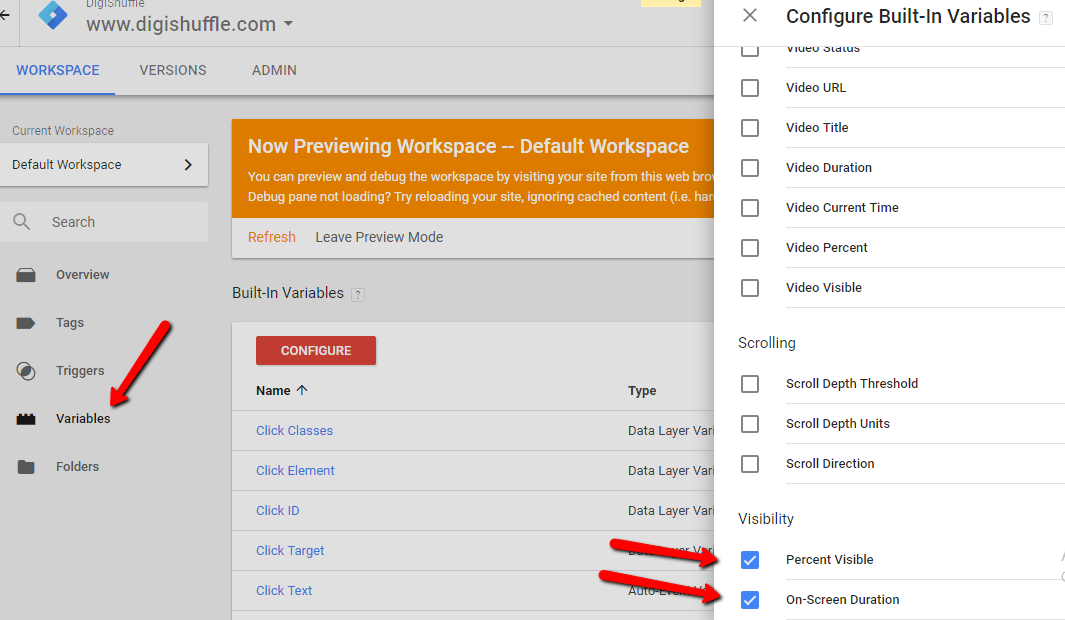
Step – 1: Enable GTM Visibility Variables
Go To Variable > Built-In Variables > Enable Percent Visible & On-Screen Duration Variable.
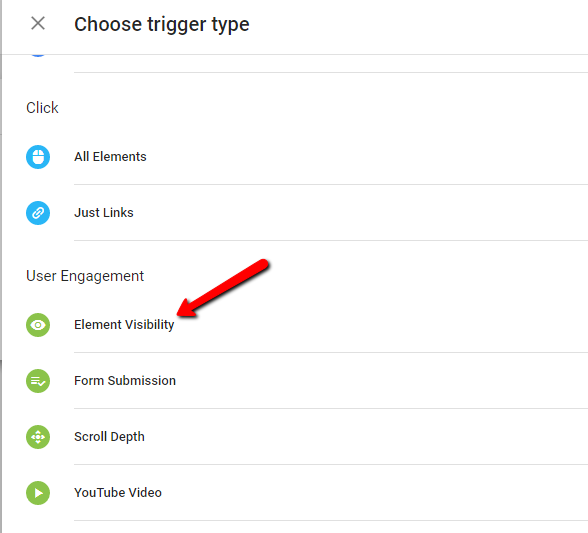
Step – 2: Create Element Visibility Trigger
Go To Triggers > Create Element Visibilty Trigger
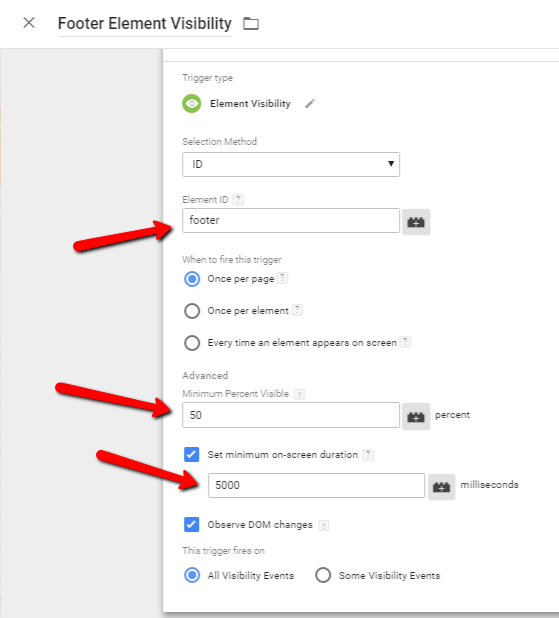
Fill In the Element ID you want to track. Check the below configuration.
- You can even choose the minimum percent visibility of element, when the event would be triggered.
- You can set the duration of visibility.
- For more info about this trigger, you can check here.
Step – 3: Create Custom HTML Tag.
Now create custom HTML tag & paste:
<script>fbq('trackCustom','FooterElementVisible',{'Duration':{{On-Screen Duration}},
'Visibility':{{Percent Visible}},'page':{{Page URL}}})</script>
Step – 4: Implement Tag Sequencing
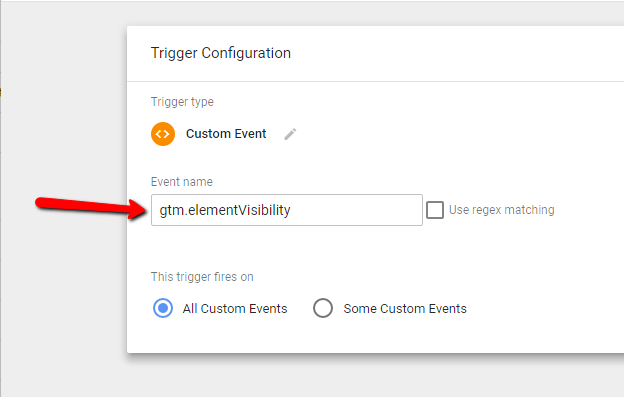
Step – 5: Fire Tag on Visibility Event
Fire the Tag with an event trigger with the name ‘gtm.elementVisibility’
Step – 6: Verify the tag
14.) User’s First Visit: Source, Medium, Campaign, Landing Page, Acquisition Date/Month & More…(First Attribution Values)
In Google analytics, you can create the remarketing lists knowing the user’s previous source, medium, campaign. Let’s try to replicate the same functionality in facebook. We’ll look at
- First Attribution – Initial Source will take precedence.
- Last Attribution – the Last source will take precedence
Let’s start with the first attribution & understand the coding process:
- When the user lands on your website with utm tags, facebook event will fire with UTM parameters source, medium & campaign.
- When the user lands directly, the Facebook event will fire source as ‘direct’ & medium as ‘none’.
- When the user lands from other sites, the website name would be used as a source & medium as ‘referral‘.
- UTMs will only be stored for 1st user visit & will not be overridden. (First Attribution)
Step – 1: Create Custom HTML Tag
Copy & Paste the dgTrack.js base code in the custom HTML tag. Paste the following code below the base code.
dgTrack.utmValues({
cookie_name: 'futm',
cookie_duration: 180,
attributionType : 'first',
callback : function(obj){
// Insert your event tracking code here : facebook custom event example //
fbq('trackCustom','firstAttribution',{
'Source': obj['source'],
'Medium': obj['medium'],
'Campaign': obj['campaign']
})
}
})
The above code will only track Source, Medium & Campaign of the user’s first visit. But you can even track other parameters such as.
landingPage: The landing page of the first visit. (Eg: /home/index.html )acquisitionDate: The date of the first visit. (Format: YYYYMMDD)acquisitionMonth: The month of the first visit. (Format: MM)cookieValueOld: The previous cookie value. (Format: MM)cookieValueNew: The current cookie value. (Format: MM)
Simply use obj['landingPage'], obj['acquisitionDate'] to retrieve the values in the callback function.
You can even modify the below fields
cookie_name:Name of the Cookie is ‘futm’ (by default)cookie_duration:Cookie Age is 6 months. (by default)
Step – 2: Implement Tag Sequencing
Step – 3: Trigger on All Pages
Step – 4: Verify using Facebook Plugin
- You can try putting utms in the url & check the ‘UTM’ Event parameters.
![]()
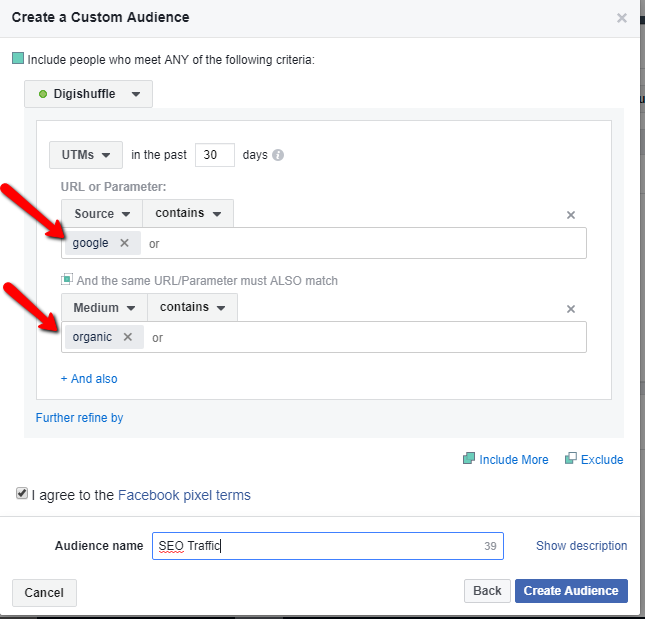
15.) User’s Last (Recent) Visit: Source, Medium, Campaign, Landing Page, Acquisition Date/Month & More…
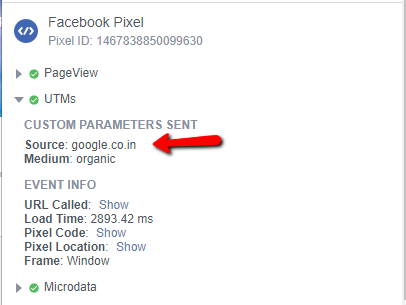
In this model, UTMs will get overridden. So..
- When the user lands on your site from Google via organic, event parameters will be
- Source: google.com
- Medium: organic
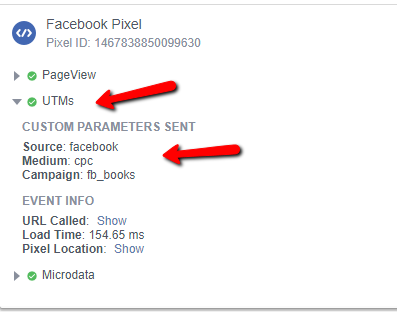
- Later, when the user lands on your site with utms, they would be used as event parameters. For Eg: www.digishuffle.com?utm_source=facebook&utm_medium=cpc&utm_campaign=fb_book
- Source: facebook
- Medium: cpc
- Campaign: fb_book
Step – 1: Create Custom HTML
Copy & Paste the dgTrack.js base code in the custom HTML tag. Paste the following code below the base code.
dgTrack.utmValues({
cookie_name: 'lutm',
cookie_duration: 180,
attributionType : 'last',
callback : function(obj){
// Insert your event tracking code here : facebook custom event example //
fbq('trackCustom','lastAttribution',{
'Source': obj['source'],
'Medium': obj['medium'],
'Campaign': obj['campaign']
})
}
})
The above code will only track Source, Medium & Campaign of the user’s last (recent) visit. But you can even track other parameters such as.
landingPage: The landing page of the last (recent) visit. (Eg: /home/index.html )acquisitionDate: The date of the last (recent) visit. (Format: YYYYMMDD)acquisitionMonth: The month of the last (recent) visit. (Format: MM)cookieValueOld: The previous cookie value. (Format: MM)cookieValueNew: The current cookie value. (Format: MM)
Simply use obj['landingPage'], obj['acquisitionDate'] to retrieve the values in the callback function.
You can even modify the below fields
cookie_name:Name of the Cookie is ‘lutm’ (by default)cookie_duration:Cookie Age is 6 months. (by default)
Step – 2: Implement Tag Sequencing
Step – 3: Trigger on All Pages
Step – 4: Verify using Facebook Plugin
Here, I have landed on site via google search
Then, I landed on site via facebook ads
Step – 5: Create Custom Audiences
- Users who came via Facebook Campaign.
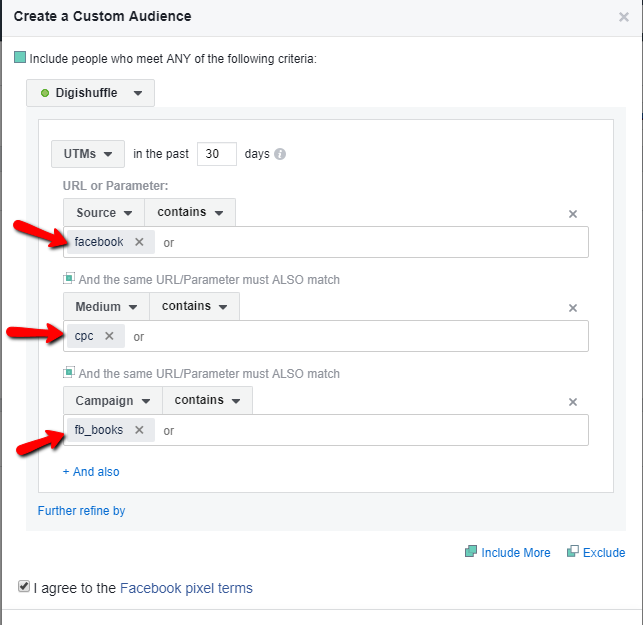
- Users who came via google organic
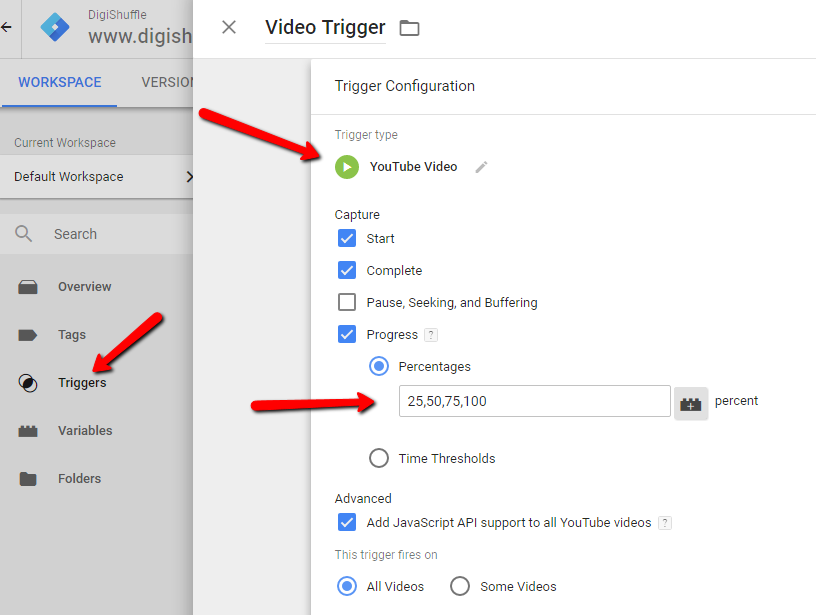
16.) Video Tracking
We can now track embedded videos on websites within seconds. Thanks to the new feature in GTM.
Here, we’ll track 3 parameters, namely
- Video Title
- Video Percentage Watched
- Video Current Time
Step – 1: Configure Video Variables in GTM
Go To GTM > Variables > Enable Video Title, Video Current Time, Video Percecntage.
![]()
Step – 2: Create Video Trigger
Create Video Trigger with the following configuration. (change as needed)
Step – 3: Create Custom HTML Tag
<script>fbq('trackCustom','VideoWatched',{'Title':{{Video Title}},
'Video Percent':{{Video Percent}},'Video Time':{{Video Current Time}}})</script>
Step – 4: Implement Tag Sequencing
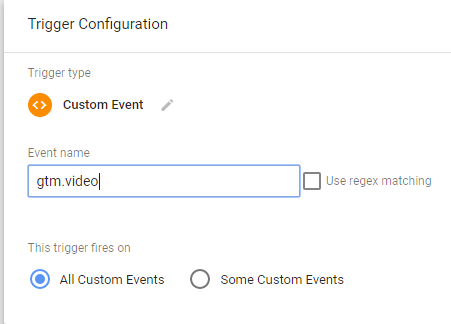
Step – 5: Fire Tag on Video Event
Create a custom event trigger ‘gtm.video’
Step – 6: Verify the Tag via Facebook Plugin.
Summary:
- Facebook has a very large audience base which is useful for remarketing.
- It has very little segmentation functionalities for remarketing.
- Make sure to verify the above events after setup & also change them as per your niche.
- Implement a combination of events to create more powerful Remarketing Lists. Eg: Organic users with LTV > 500$, etc
- Feel free to add/discuss new ideas in comment. 🙂
Note: In some IE Browsers, you might get “https://gtm-msr.appspot.com/render2?id=GTM-XXXXX” as the event page in the Facebook dashboard.
Use,
if((document.location.href.
{ FB_CODE }
More Links:
How To Extract Facebook Ads & Page Post Insights: Like, Share & Comment To Sheets
Facebook Pixel Helper: How To Use? & Debug Pixel Errors The Proper Way [BONUS TIPS]
Facebook Tracking Pixel: Setup Process & 30+ Pixel Event Codes.
300+ Facebook Metrics List [Ad Insights + Page Metrics] With Definition
Track Facebook Like, Comment & Share in Real Time – Google Analytics & Google Sheets
Ritwik is a product owner at DigiXport. He also loves to write technical & easy to understand blogs for Marketers & Entrepreneurs. A Firm Believer in Teaching -> Learning -> Growing. :)
Hi Ritvik,
Please provide in details for Scroll Custom Audience.
Hi Sameer,
I have updated some points, hope they would be helpful.
Hello, how do I define the ‘PagesPerSession’ variable? I imagine I can read it from the cookie ‘pv_per_sess’, or is there another way?
Yes…you are right..!! I have updated the GTM variable creation part. Thanks for pointing it out.!!
Amazing list. Unfortunately, I can’t get the time on page to be transferred to the pixel.. only the page will be shown. In the datalayer it is clearly visible but the variable itself goes by undefined. I quadruple checked the spelling and scripts now.
Any ideas?
Hi Maxi,
Try reloading the page & immediately cancel it. (pressing F5 + then Esc). Then check the events in GTM debugger or in Facebook Pixel helper plugin
Thanks
Unfortunately no, because my custom conversion and audience is empty aswell.
Another issue that came up recently is:
“redirect from has been blocked by CORS policy: The value of the ‘Access-Control-Allow-Origin’ header in the response must not be the wildcard ‘*’ when the request’s credentials mode is ‘include’.”
Might be me uploading the pageviews and scrolling data to GA.. If I could only wrap my head around where something went wrong, it would all be so much easier 😀
Hey Maxi,
Did you trigger the Facebook Time on Page custom HTML on event ‘sendTiming’ ? I have updated that point now.
Thanks
Thanks, yes I did.. Seemed to be a caching error.. my error 🙁
What is the best approach with google tag manager if someone would use all 10 custom events? Wouldn’t it load the pixel multiple times? Would you put all triggers together somehow?
Great stuff. Could the CSS selector be used for iFrame’s buttons?
I guess No… I am not sure though.!!
Hi, what is the metric used for time on site event? Seconds, Ms or else? Thanks 🙂
Hi @ChrisVelev:disqus ,
Its milliseconds. (y)
Thanks 🙂
Hi. After implementing the steps for 5) Button Clicks, I tried to publish the tag and get these following errors ( see them in the image attached). Do I need to publish these settings to make them work ?
https://uploads.disquscdn.com/images/467a1f12c4ea837052d78fd685d394c89b48ecb72612c0334db22ab04d3dc5b7.png
Also, when checking if the pixel is fired for the website, the pixel associated with the “Button Click” does not appear unless I click on the button. Here is what it looks like in the Facebook Pixel Helper
https://uploads.disquscdn.com/images/22a7fab3f5317144cef8162adfe1274f1fe594ce413f84beb7bcbcbb70ff5731.png
Moreover, I tried to create the custom conversion for people who click on the button using the event “Button Click” but it seemed like the event did not appear for me to choose.
I am a bit confused about these steps. Hope you can enlight me 🙂 Thanks
Hi Ashley,
The GTM variables {{Click Element}} & {{Click Text}} need to turned on.
In GTM, Go To Variables > Configure > Enable Click Element & Click Text.
Thanks 🙂
Hi Ritwik,
In Facebook Pixel Helper, It looks like the two parameters page and name is not sent after my setup.
https://uploads.disquscdn.com/images/22a7fab3f5317144cef8162adfe1274f1fe594ce413f84beb7bcbcbb70ff5731.png
When I create custom conversion on facebook, I can only use the parameter “page”
https://uploads.disquscdn.com/images/4a3ffd6523a041f091e2b4ba2109fa90be3d5c4458b96ef11b634ec5ba223e8f.png
I want to create a custom conversion to track which button is clicked in my landing pages, so I have to use the parameter “name” right ? But I cannot find it. Hope you can help 🙂
Asley
I guess you are using ‘buttonText’ as custom params. It takes some time to show up in FB dashboard.
Thanks for the article. I feel like I’m missing something though. I am trying to track an outbound link (no optional params, using GTM to trigger it). However, my custom event name is not showing up inside Facebook when I try to create a custom conversion. It only offers PageView
If I just type the event name after choosing “event”, the “next” button remains inactive, so I can’t move to the next step. I used the Facebook pixel helper extension and it does show it firing.
If you have any ideas it would be very appreciated.
Hi David,
The events need to be populated in Facebook Event Manager : https://www.facebook.com/events_manager/pixel/events.
Before it can show up in facebook custom audience. It won’t take much time.
Thanks
Thanks. Yeah. It showed up the next day. Thanks.
Completely out of my depth here. I installed a Facebook Pixel, and the automatic setup selected two standard events related to checkout and quantity, which is great.
I’d like to add some more meaningful ones to the list, but without going full retard. What is a great event to be monitoring for people selling furniture online?
Hi Sacha,
It depends on your goals. I would suggest LTV, Pageviews/User, Acquisition Source/Medium/Campaign, All Ecommerce Events (standard events), etc.
Also, if you use any CMS like shopify, there are readily available plugins for ecommerce/standard events.
Lastly, Follow Jon Loomer for more advanced facebook strategies.
You can check more @: https://www.digishuffle.com/blogs/facebook-custom-events/
Thanks,
Ritwik
Thanks for this — this is awesome. One questions regarding:
“Note: In some IE Browsers, you might get “https://gtm-msr.appspot.com/render2?id=GTM-XXXXX” as page in Facebook dashboard.
Use,
if((document.location.href.search(‘appspot.com‘)==-1)&&(document.referrer.search(‘appspot.com‘)==-1))”
I’m seeing this in my FB dashboard; where do I insert this?
Insert this around any facebook custom HTML event code you are implementing/
For Eg: For Outbound Clicks the code would be
if((document.location.href.search(‘appspot.com‘)==-1)&&(document.referrer.search(‘appspot.com‘)==-1))
{
fbq(‘trackCustom’,’Link Clicks’,{‘name’:{{Click URL}},’page’:{{Page URL}}})
}
Thanks,
Ritwik
Hey Ritwik,
Regarding # 9 Time On Page.. I’ve done all points as mentioned. Just facing issue with creating custom audience in Facebook.
I’m unable to get any setting in custom audience with condition like “Visitors on homepage with more than 3 seconds”
What is the best way to setup custom audience when “visitors on X page with more than Y seconds time on page”?
Thanks
Ian
Hey Ian,
Try selecting Custom Events form the dropdown in custom audience pop up.
https://uploads.disquscdn.com/images/124ccf88dc78c48ba318ad856e2d748a3cfbe0ac6a8c27bb933e8ad797ecf9db.png
Thanks,
Ritwik B
Hi Ritwik,
Yes, it working now. Thank you very much.
Regards,
Ian
Hi Ritwik,
Thanks for this!
For #9, is there a way to get information on other source/mediums like Google CPC?
Thanks
Hi great page the rest of the site too.
2 things
I was trying to get the scroll tracking and timing to work and got invalid script error. Is this depreciated now that these are inside tag manager. I really like that since I can tell if they read the page.
Think I fixed this one. Forgot to add script tags to the copy and pasted code.
That person also has another script that would be great since I have a client whose AVG time on site is 30 min. I think they log in and let it sit all day but would love to give them some stats on exactly whats happening. Have you tried that script?
Hey Ritwik, great stuff here, thanks!
I have a question for 15.) Source, Medium & Campaign – UTMs – Last Attribution:
After implementing the code&tag i’m getting two UTM parameters/events, one is working fine and the other one shows an error:
https://uploads.disquscdn.com/images/dce77f908586048caf7116076e377c3c92274de10b0bb88a6fc22b3ffb534e49.png
Any ideas why?
It is inside our testing environment.
When i remove the utm cookie tag from our page, both UTM parameters/events disappear.
Thanks!
Pingback: grandpashabet