Getting Started


Note: After authorization, Re-Open the sidebar to see the full list of accounts.
Note: Facebook leads ads will be authorized with the Facebook authorization. Currently, we’re in the review process for facebook lead ads so you won’t be able to export leads for a while.

Date Range:
- You can select Custom Date Range Or Pre-Defined Range from the drop down.
- Changing accounts in the account drop down will not refresh the dates.


- Additional Options: Select the additional options to enable GAupload, noHeaders, Multiply fields,etc
- Export: Export the Data. No Export limit in Beta.
- Log Out: Logout of the currently logged account.
You need to select the ‘Account’ drop down before clicking log out.
Additional Options:
- Save Query: It will generate the query ID in the ‘Saved_Queries’ sheet. This Query ID can be used for scheduling ads data export for facebook & bing.
- No Headers: Enabling it will remove the headers row from export.
- GA Upload: Enabling this will export ads data in the format compatible for Google Analytics Upload.
Eg: You can use ‘facebook’ & ‘cpc’ as source & medium for data export. The source & medium column will be appended as the last columns as export. For Facebook, you’ll have an option to select the UTMs from Ad. - Append Data: Data will be exported after the last row. (Headers will not be included)

Queries & Scheduling Features


Step – 3
- You can use ‘Test Queries‘ to test & export multiple queries. (even after the scheduling is ON)
- Export Selected Query: Before Scheduling, make sure to export the queries to check if they work as expected.
- Delete Selected Query: To delete any query simply select the query\queries in the box & click delete selected query. After deleting the refreshed query list will appear in the saved queries sheet.
- It’s good to save queries in different sheets as the sheet data gets refreshed before new export.
- If you have saved queries in the same sheet make sure to follow the right Cell number sequence as described below in “How To Use Custom Header” section.
Check Here For More: How To Export Multiple Queries in Multiple Sheets
Note: You cannot add/remove/duplicate/edit queries directly from the query sheet.

Google Analytics Upload
Upload Cost Data To Google Analytics
Step 1: Facebook Ads Data Upload

Step 1: Bing Ads Data Upload


- To Upload Facebook OR Bing Ads Data in Google Analytics, you can check the GA Upload box.
- You can use “Multiplier” for currency conversion. (currently only spend field can be multiplied)

Step – 2
- Open GA > Property > Cost Data.
- Create Cost Data > Enter the required Columns as keys.
- Save the dataset.
- Copy the “headers” available in the schema. (ex: ga:campaign, ga:adCost, etc.) & paste it in the above sheet.
NOTE: Make sure to properly map the column headers


Step – 4
- After Clicking Upload Data, the data would be sent to google analytics.
- If Google Analytics Upload completes successfully, you’ll see the Success message.
- Else, You’ll see the Error message.
- To Automate the process, check link query docs.
To Automate The Google Analytics Upload for multiple accounts. Check Out The NEW Link Query Feature
Solving Errors
You may receive errors in the following scenarios while exporting Facebook Or Bing Ads data:
- Exporting incompatible fields combination.
- Only Exporting Dimensions Or Metrics. (Eg: Campaign name Or Impressions)
- Token Expired.
- Not including ‘Date Start’ in the field box while breaking it down by date or using GA upload format.
- Request Large Amounts of Data.
Known Errors:
“An Unknown Error Has Occurred” – This error mostly occurs on requesting large amounts of data.
Try to reduce the date range & export data in chunks.
OR
Export data at account or campaign level (instead of ad level)
Other FAQs
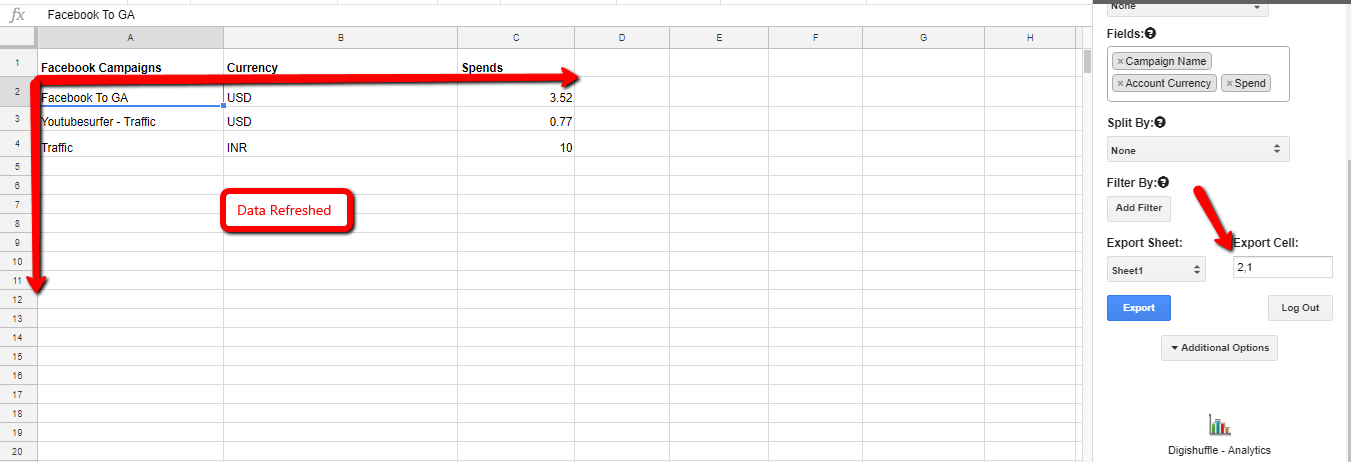
While exporting the data DigiXport refreshes the data export sheet.
The refreshed data is dependent on the output cell.
The data to the right & bottom from the output cell is refreshed.
For Eg: So the data refreshed for the outputcell (2,1) would be as follows:
Even after the export, you can recover the deleted data by pressing CTRL+Z.
- Make sure that the query is exported without any errors before scheduling (by clicking on “Export Query”).
NOTE: The scheduling will stop if it encounters any errors.
- Logging out of the accounts will also stop the scheduled queries.
- Current Query limit for paid users is 10.
- You can also try re-scheduling the queries. Try clicking ‘Reset All’ to delete all the queries & its scheduling settings.
Reporting Guides
Use Sheet Query API & Data Studio To Create Appealing Reports
For More Info About
- Creating Reporting Templates & Dashboard
- Using Data Studio with DigiXport
- Using Query Function To Modify The Exported Data.
Check out the reporting guide below.