Last Updated on April 21, 2019 by Ritwik B
In this article, we’ll be looking at some the hacks which you can use to track multiple funnels in google analytics.
Here are some of the cases where you might have to setup multiple funnels.
- Same Site & Different Funnels for Same Products.
Eg: If your website has different steps for Logged-In & Non-Logged Users purchasing the same product. - Same Site & Different Funnels for Different Types of Products. (Selling Subscription Or Services Or Products)
Eg: If your website sells monthly subscriptions & also e-commerce products will have 2 different funnels. - Different Website & Different Funnels for Same Products.
Eg: If you have a different website for buying the same product for new & premium users. Maybe premium users having a discounted rate. - Different Website & Different Funnels for Different Types of Products.
Eg: If you have different websites selling different products but are interlinked. (are tracked in same property)
If I have missed any scenario, feel free to add it in a comment.
So, let’s begin…
Important Pre-Requisites: Multiple Funnel Implementation
Before starting the implementation process make sure you have these things checked.
1.) Go Through All The Funnel Steps To Check If The Google Analytics Tracking Code Fires.
If you have implemented Google Analytics via GTM or used the CMS settings to place the code, just go through the funnel steps & make sure the google analytics code fires.
You can use the Tag assistant chrome add-on to verify the code firing. If you have different steps for Logged-In & Non-Logged Users, make sure the code fires for both of them.
2.) Outline All The Multiple Funnel Steps
This is quite an important step.
It will help all of your team members to be on the same page. Also, if you have some of the funnel steps as hash ‘#’ URLs (no pageviews), you can add it to the layout. (as checkout#shipping, checkout#billing)
Here’s an example of a funnel step for an e-commerce

Multiple Funnels Hack #1: Utilize Event Funnels In Dashboards
This is simple…
You just have to fire the Google Analytics Event Hit at every step of the funnel.
Even if the funnel steps include
- Pageview Or
- Hash Change Or
- Query Parameter Change
If you want to track any other attribute/information along with the event hit, you can fire a hit level custom dimension. (Eg: LoggedIn User Or LoggedIn User)
After that, you can go to the analytics dashboard & create a Bar chart (Or Table chart). Apply the event filter & respective metric (‘User’ or ‘Sessions’) to get the funnel. (We’ll look at the step by step implementation later)
In this method, you can create many different funnels & also you can add/remove any number of steps.
Bar Chart Funnel

Table Chart Funnel

Pros:
- You can use ‘User’ as a Metric in the funnel. (unlike sessions in goal funnel or checkout funnel)
- You can create multiple funnels with variable steps. (with segmentation)
- You can use Bar or Table chart for visualization.
- These funnels can be saved in the dashboards.
Cons:
- You cannot simply click & create a remarketing list as in checkout funnel. (You’ll have to use custom segments to make that happen)
- You’ll have to configure the Bar or Table chart widget even after creating the event. (But that’s a 2min job).
Example:
You can fire an event at each step as follows
- Event Category: E-commerce Funnels
- Event Action: [NAME OF THE STEP]
- Event Label: [LOGGED OR NON-LOGGED USER] Or
- Custom Dimension: [LOGGED OR NON-LOGGED USER]
Step – 1:
After setting up the events, Go to the Behavior > Events > Top Events report to check if every event is gettings captured properly.
Or
You can simply search for ‘Top Events’ Report in the upper right search box.
Step – 2:
Next, Go To Customization > Dashboard > Create New One.
Add a widget with following options
- Select Bar Chart.
- Select Metric as ‘User’.
- Select the Bar Chart Sorting. (via the small ‘downward’ icon to the right of the metrics). This will render your funnel from left to right.
- Select Group By ‘Event Action’. (That’ll be your Bars)

Now, this is an important the step…
Use widget filters to filter only the
- ‘E-commerce Funnels‘ Events via ‘Event Category‘ field.
- ‘LoggedIn Users’ label via ‘Event Label’ field. (Or Custom Dimension, if used)

Other Points:
- To increase the number of bars, select the ‘number of bars’ drop-down.
- You can even use other metrics like Sessions, Pageviews, Goal Completion, E-commerce Conversion Rate, etc
Multiple Funnels Hack #2: Use Segment Funnel on Reports with Different Dimensions
In this hack, you’ll have to create segments for each step of the funnel. You can use
- Events
- Pageviews
- Virtual Pageviews
to create these segments.
After that, apply those segments in any report, let’s take the Audience > Overview Report.
Here’s what you’ll get:

You can use these segments funnels on reports with different dimensions. Eg:
- Device Report
- OS Report
- Browser Report
- City / Country Reports & more
This will help you in debugging the reasons for high drop-offs in each funnel steps.
Here’s the report for the Device & OS.
Segment Funnel: OS Report

Segment Funnel: Device Report

Pros:
- You can get the funnel for various metrics including
- Acquisition Metrics – Users, Sessions
- Behavior Metrics – Avg. Sessions Duration, Pages / Sessions
- Conversion Metrics – Goal Completion, Goal Conversion Rate.
- You can get the funnel in a single dashboard broken down by Channels, Devices, Country & many more dimensions.
- The funnel segments created can easily be used to build your remarketing list.
- The reports can be saved & are available in customization > dashboards.
Cons:
- Only 4 Segments can be added to the report. This is a major drawback.!!
- Multiple funnels cannot be represented on a single dashboard.
- Time taken to create segments might increase depending on the number of funnels & steps. (in each)
Example:
Let’s take the similar example of LoggedIn & Non-Logged Users.
As we are constrained by the number of steps, we’ll assume the funnel to be
- Logged Users: Checkout > Shipping & Billing > Transactions
- Non-Logged Users: Checkout > Login / Register > Shipping & Billing > Transactions
While creating a segment make sure you have a hit level custom dimension for LoggedIn & Non-Logged Users.
Depending on the type of hit (Pageview, Event Or Virtual Pageview), create the segments

Other Points:
- You can create the segment funnel report & save it. The saved reports will be available in the Customization > Saved reports.
- You can use the same segments to Build Audiences & they will be reflected in the Audience > Audiences Report.
Multiple Funnels Hack #3: Behavior Funnel To Visualize Sequential Hits
Similar to the previous hack, you need to set up the funnel events (or virtual pageviews).
Behavior flow reports are readily available in the ‘Behavior‘ section in google analytics.
You can select the view type as
- Events Or
- Events & Pageviews
This will show all the events/pageviews triggered by the users in a sequential manner.
Here’s the report

You can see the sequential events which user followed after landing on your website. You can highlight the flow by clicking on the linkage between the events.
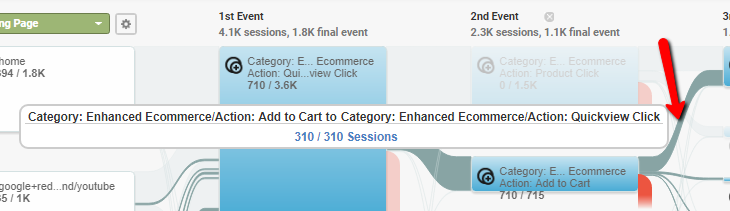
You can also quickly see the drop-offs after every event. These drop-offs are termed as ‘Final Event‘ in each event box.
On clicking the box, you’ll get 3 options
- Highlight traffic
- Explore Traffic
- Group Details
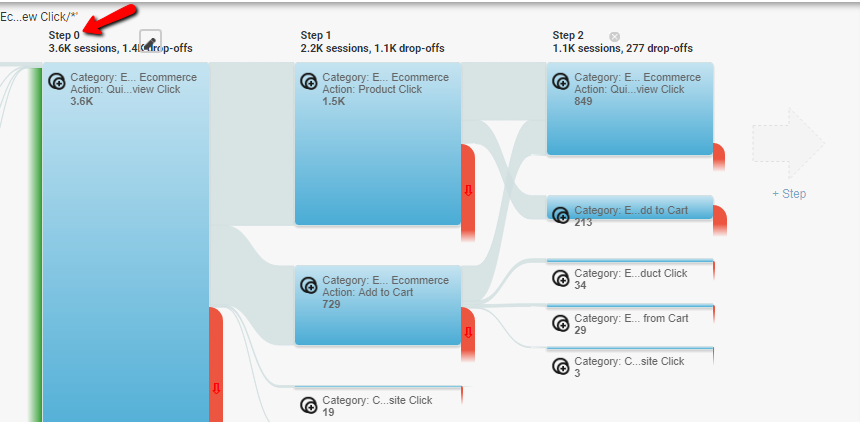
You can select ‘Explore Traffic through here’ to view the event as a starting point in the funnel.
Pros:
- You can see Sequential Events & Pageviews in a single report.
- You can see the events & pageview drop-offs in the user flow.
Cons:
- You cannot save the behavior flow reports.
- You cannot filter specific events which are used in funnel tracking.
- You cannot use other metrics like ‘User’.
- It is a bit complex to view multiple funnels in a single dashboard.
Example:
To view multiple funnels in behavior flow reports, you’ll need to capture the funnel hits as
- Event Category: E-commerce Funnels
- Event Action: [NAME OF THE STEP]
- Custom Dimension: [LOGGED OR NON-LOGGED USER]
After setting up the events, follow this:
- Select view type as ‘Events‘ & Level of details as ‘Category/Action’.
- From the drop-down below, select the custom dimension. (You can even use the filter on the right side)
You’ll get 2 user path (one for LoggedIn & other for Non-logged users)
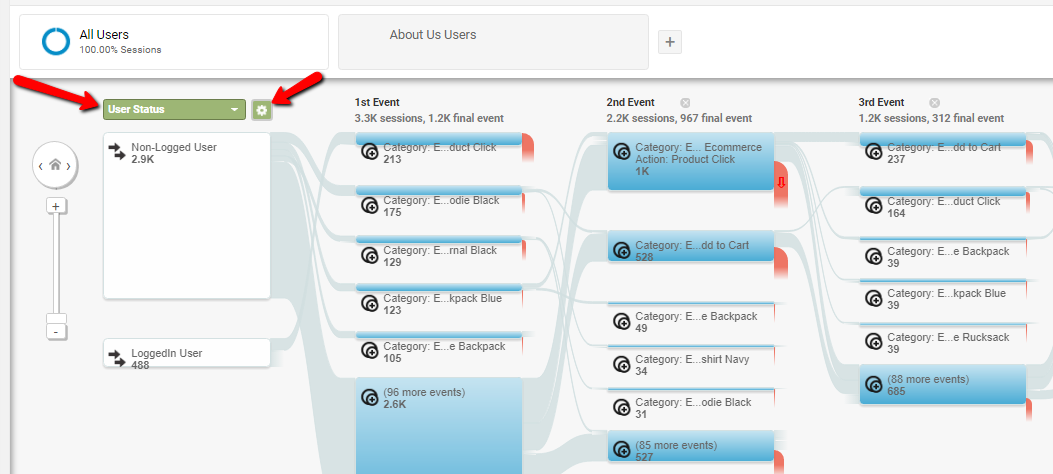
Other points:
- You cannot add segments to Behavior Flow reports.
- But you can use ‘Custom Dimension’ to break down the user flow into the respective values.
Multiple Funnels Hack #4: Use Shopping Behavior Funnel With Custom Dimension
To enable the Checkout Behavior Funnel report in google analytics, you’ll first need to enable & setup enhanced e-commerce tracking.
We’ll not be going into details about the setup but you can check here for enhanced e-commerce setup via gtm.
Once everything is set up, you’ll see the funnels in Conversions > Ecommerce > Checkout Behavior.
You cannot have 2 completely different funnels with different goals.
But you can utilize the dimension dropdown which is available below the funnel.
Here’s the checkout funnel report segmented by devices.

To create multiple funnels, you can use session level custom dimension.
The report can be segmented by various other dimensions like User Type, City, Source/Medium, Channel & more…
The top part of the broken Blue bar represents the session entered midway in the funnel.
Pros:
- Good Funnel Visualization.
- You can easily create the remarketing list by click on the bar or the drop-off arrow.
- You can segment the funnel by user type & custom dimensions.
Cons:
- The report is session based.
- You need to implement enhanced e-commerce (checkout) tracking code.
- You need to implement custom dimensions too. (For segmentation purposes)
Example:
Let’s take the similar example as before.
To track loggedIn & Non-Logged Users, you need to create session level custom dimensions.
So, while implementing enhanced e-commerce checkout code, pass a custom dimension. (Logged Or Non-Logged)
The same can be used to segment the checkout behavior report.
Note: The Only drawback of this method is if the user logs out after the transaction, the entire session will be attributed to Non-Logged Session.
Remember Checkout funnel & Goal Funnels are session based. You can use event funnels to tackle this situation.
Multiple Funnels Hack #5: Define 'N' Goals for 'N' number of Goals Funnels
You might have read 100s of blogs about goal funnels. Remember that
Google Analytics Goals are session based & only the first occurance gets counted.
To define a goal funnel, you must track the page view hits across the checkout funnel. If your checkout has the same page URL, you can fire virtual pageviews.
Unfortunately, Events cannot be used to define funnel steps in goal funnels.

Pros:
- Good visualization of the funnel
- You just need to define a goal & funnel steps. (no need of enhanced e-commerce tracking)
- You can clearly see the drop-offs % at every step
- While defining goal you have to option disable the entrances midway in the funnel.
Cons:
- This report is session based
- You don’t have segmentation functionalities
- Creating many virtual pageviews will skew your pageview data.
- You cannot create remarketing audiences for the drop-offs or users completing the steps.
- Only 20 Goals per view can be created, which means, 20 goal funnels per view.
Example:
If we need to track LoggedIn & Non-Logged user funnels, it can be quite tricky.
We are constrained by segmentation functionalities in goal funnel report. So the only way is to track virtual pageviews for each checkout step in multiple funnels.
So, here’s the virtual pageview you can track for
- LoggedIn users
- lg/cart-page
- lg/checkout
- lg/billing
- lg/shipping
- lg/order-success
- Non-Logged users
- /cart-page
- /checkout
- /billing
- /shipping
- /order-success
‘lg’ is just the term which represents ‘LoggedIn’ users. Feel free to use any format.
When you’re done setting up the virtual pageview, head towards the goal settings.
Goal Funnels are currently only available for the goal type ‘destination’.

Goal URL defined in the destination box is the last step of the funnel. Don’t define it again in the funnel steps below.
Make sure you check these things
- Goal type is ‘Destination’
- The filter type used for destination URL is also used in defining the funnel steps. In the example above the filter type is ‘Regular Expressions‘ & the same is used for funnel steps. (/cart, /checkout$, etc)
- If you had any recent Goal completion, you click on ‘Verify This Goal‘ to confirm the condition matches correctly.
Similarly, create another goal for logged in Users & use the virtual pageviews as the funnel steps.
You can use the Goal drop down in the funnel visualization report to toggle between LoggedIn & Non-Logged Users.
What If You Have Funnels Across Multiple Domains?
There are 2 cases here…
- Funnels across domain & its sub-domain. (example.com & pay.example.com)
- Funnels across 2 different domains. (example.com & infusionsoft.com)
1.) Domain & its Sub-Domain
When you have funnels across subdomains, you don’t need to implement cross-domain tracking.
Reason being the GA cookie is stored on the root domain (example.com) & is available for all its subdomains. (blog.example.com, www.example.com, etc)
Just follow this
- Make sure to place the same analytics code on the sub-domain. (as on the root domain)
- Normally, Implement the above methods for tracking multiple funnels.
2.) Different Root Domains
Now, There might be a case where
- You have the payment or checkout on the 3rd party domain. OR
- You’re an affiliate site where you divert people to the 3rd party checkout on link click.
In both the above cases you need to implement cross-domain tracking.
![]()
I won’t be going into details of implementing it. You can check the above link for more.
But here’s what you can do
- You can place the analytics or tag manager code on these different domains.
In some 3rd party Tools like Leadpages, Infusionsoft, etc, you’ll have the option to place the javascript code in the given block. You can use that… - After the cross-domain has been successfully implemented, you can use the above methods to track multiple funnels.
What if The URLs on these 2 domains are similar?
In that case, you can use view filter to concatenate the hostname & page URL. So, the URLs displayed in your google analytics will report full URLs.
Rest, the process remains the same.
Conclusion:
- The Event Funnel is more scalable, as you can
- Use ‘User’ metric for the funnel. (rather than sessions)
- Define as many events as you want. You can even send Non-Interaction events so that these funnel hits will not skew your engagement metrics.
- You can extract then via API
- You can create the remarketing list in no time.
- Good visualization via Bar & Table charts in the dashboard.
- If you plan to use Goal Funnels Or Enhanced E-commerce Checkout Funnel, remember these are sessions based.
- In most cases, you will need to fire events at checkout flow steps. (Preferably, use Non-interaction events)
- Virtual Pageviews will skew your pageview data, so the trick is to use some kind of sign to identify it (Eg: /vp/cartpage, /vp/checkout, etc). That way you can filter out the VPs from pageview report.
Lastly, kindly share, share & share.!!! & also comment, comment & comment. (even if you implement it correctly or face any issues, it’ll help other 🙂 )
Ritwik is a Web Analyst & Product Marketer. He loves to write technical & easy to understand blogs for Marketers & Entrepreneurs. Focused on Google Analytics, Facebook Analytics, Tag Management, Marketing & Automation Scripts & more. Google Certified Professional. A Firm Believer in Teaching -> Learning -> Growing. :)
Hi Ritwik, i recognized this issue ! 🙂
May be you can help me with another one.
I’ve got a main nav which appears on click (picture 1 and 2).
What i want is to get all the path on GA event. My category is harcoded “main nav”, the action too “allproduct”. In label, for example i would like to have “occasioni_boutique delle occasioni_Television LG” ( https://uploads.disquscdn.com/images/21a17fb15c0a2219b40e5ece35b8793a479a8224992faab485b6e795c318b3a3.png https://uploads.disquscdn.com/images/f3cf59a32e94bf8e2e062078b750e96d0b2ca4eb7ddd10917d23701d7ce250ea.png https://uploads.disquscdn.com/images/54e5cc475491bc91581d66ffe676b971ecb7f898be9ccbced4cd953d1f8e504d.png picture 3).
May be you have a solution for this tricky gtm issue ?
Thanks a lot !
Alan