
Last Updated on October 8, 2020 by Ritwik B
Recently, Facebook has added some new standard events. We’ll look into each of them in a while.
- Standard Events
- Custom Events
// Standard event (can be used for conversion tracking// and optimizing in addition to audience building)
fbq('track', 'Purchase', {currency: 'EUR', value: 15.23});

// Custom event (can only be used for audience building)
fbq('trackCustom', 'MyCustomEvent', {custom_param: 'custom_value'});
Facebook Standard Events – Implementation
Where & How To Place the Facebook Standard Pixel Code?
Which are the different Facebook Standard Events?
- ViewContent
- AddToCart
- AddToWishlist
- InitiateCheckout
- AddPaymentInfo
- Purchase
- Lead
- CompleteRegistration
- Search
- Contact
- CustomiseProduct
- Donate
- FindLocation
- Schedule
- StartTrial
- SubmitApplication
- Subscribe
1.) ViewContent
You can use ViewContent to fire on
- Blog Article
- Product Page
- Other Landing Page
Let’s take an example of an ecommerce site…
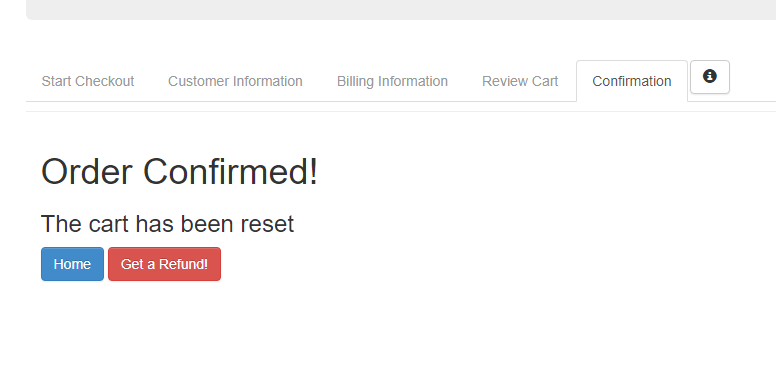
So, this code will fire when the user lands on the product details page. So, on the demo site when you click on the product you will land on the page which is as follows.
Step – 1: Populate the DataLayer via Server Side
<script>
var window.dataLayer = window.dataLayer || [];

dataLayer.push({
'event' : 'ProductDetailPage',                         //used for creating GTM trigger
customDataFB :
     { 'content_name' : [NAME_OF_PRODUCT],
        'content_category' : [PRODUCT_CATEGORY],
        'content_ids : ['SKU#1' , 'SKU#2', 'SKU#3' ],
        'content_type': 'product',
        'value' : 33,
        'currency' : 'USD',
        'inStock' : 'Yes',                       // (Optional)
        'ProfitPerProduct' : 10              // (Optional)
       }
})
</script>
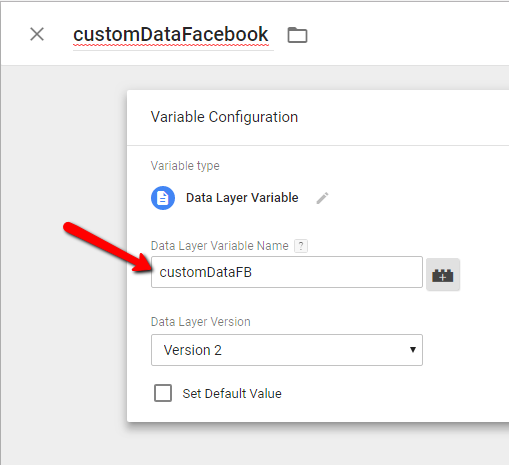
Step – 2: Create GTM Variable – ‘customDataFacebook’
Step – 3: Create Custom HTML Tag & paste the following code.
<script>
fbq('track', 'ViewContent', {{customDataFacebook}} );
</script>
Step – 4: Implement Tag Sequencing
Step – 5: Create an Event Trigger
Step – 6: Use Facebook Pixel Debugger & Create Conversions & Audiences
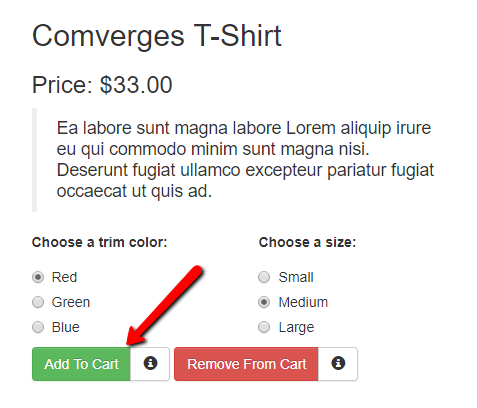
2.) AddToCart & AddToWishlist
- fbq(‘track’, ‘AddToCart, ……) for AddToCart
- fbq(‘track’, ‘AddToWishlist, ……) for AddToWishlist
Step – 1: Populate the dataLayer
<script>
var window.dataLayer = window.dataLayer || []

dataLayer.push({
'event' : 'AddToCart',                         //used for creating GTM trigger
customDataFB :
     { 'content_name' : [NAME_OF_PRODUCT],
        'content_category' : [PRODUCT_CATEGORY],
        'content_ids : ['SKU#1' , 'SKU#2', 'SKU#3' ],
        'content_type': 'product',                       //Don't change
        'content' : [ {'id' :'SKU#1',                    // Used For Dynamic Remarketing
                          'quantity' : '2',
                          'price' : 33 }],
        'value' : 33,
        'currency' : 'USD',
        'inStock' : 'Yes',                       // (Optional)
        'ProfitPerProduct' : 10              // (Optional)
       }
})
</script>
Step – 2: Create a GTM Variable – ‘customDataFacebook’ (Skip This Step if Already Created)
Step – 3: Create Custom HTML Tag & paste the following code.
<script>
fbq('track', 'AddToCart', {{customDataFacebook}} );
</script>
Step – 4: Implement Tag Sequencing
Step – 5: Create an Event Trigger
Create custom event trigger named ‘AddToCart’ & publish the tag.
Step – 6: Use Facebook Pixel Debugger & Create Conversions & Audiences
3.) Initiate Checkout
- When someone clicks on checkout button OR
- When someone lands on the first checkout page.
Step – 1: Populate the dataLayer

<script>
var window.dataLayer = window.dataLayer || [];

dataLayer.push({
'event' : 'CheckoutInititated',                         //used for creating GTM trigger
customDataFB :
     {  'content_ids : ['SKU#1' , 'SKU#2', 'SKU#3' ],
        'content_type': 'product',                                //(Optional)
        'contents' : [ {'id' :'SKU#1',                              // Used For Dynamic Remarketing
                          'quantity' : '2',
                          'price' : 30 }
                          {'id' : 'SKU#2' ,
                           'quantity' : 3,
                            'price' : 40],
        'value' : 180,
        'currency' : 'USD',
        'num_items' : 2
       }
})

</script>
Step – 2: Create a GTM Variable – ‘customDataFacebook’ (Skip This Step if Already Created)
Step – 3: Create Custom HTML Tag & paste the following code.
<script>
fbq('track', 'InitiateCheckout', {{customDataFacebook}} );
</script>
Step – 4: Implement Tag Sequencing
Step – 5: Create an Event Trigger
Step – 6: Use Facebook Pixel Debugger & Create Conversions & Audiences
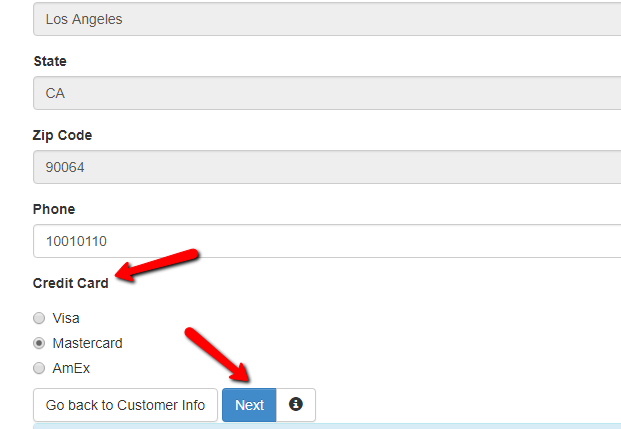
4.) Add Payment Info
- The payment info has been added to billing info page & user clicks next. OR
- When lands on next page. (Review Cart)
Step – 1: Populate the dataLayer
<script>
var window.dataLayer = window.dataLayer || []

dataLayer.push({
'event' : 'PaymentInfoAdded',                         //used for creating GTM trigger
customDataFB :
     {  'content_ids : ['SKU#1' , 'SKU#2', 'SKU#3' ],
        'content_type': 'product',                                //(Optional)
        'contents' : [ {'id' :'SKU#1',                              // Used For Dynamic Remarketing
                          'quantity' : '2',
                          'price' : 30 }
                          {'id' : 'SKU#2' ,
                           'quantity' : 3,
                            'price' : 40],
        'value' : 180,
        'currency' : 'USD'
       }
})
</script>
Step – 2: Create a GTM Variable – ‘customDataFacebook’ (Skip This Step if Already Created)
Step – 3: Create Custom HTML Tag & paste the following code.
<script>
fbq('track', 'AddPaymentInfo', {{customDataFacebook}} );
</script>
Step – 4: Implement Tag Sequencing
Step – 5: Create an Event Trigger
Step – 6: Use Facebook Pixel Debugger & Create Conversions & Audiences
5.) Purchase
- Website ROAS
- Website Conversion Value
So, let’s get started…
Step – 1: Populate the dataLayer
<script>
var window.dataLayer = window.dataLayer || []

dataLayer.push({
'event' : 'TransactionSuccess',                         //used for creating GTM trigger
customDataFB :
     {  'content_ids : ['SKU#1' , 'SKU#2', 'SKU#3' ],
        'content_type': 'product',                                //(Optional)
        'contents' : [ {'id' :'SKU#1',                              // Used For Dynamic Remarketing
                          'quantity' : '2',
                          'price' : 30 }
                          {'id' : 'SKU#2' ,
                           'quantity' : 3,
                            'price' : 40],
        'value' : 180,
        'currency' : 'USD',
        'num_items' : 2
       }
})
</script>
Step – 2: Create a GTM Variable – ‘customDataFacebook’ (Skip This Step if Already Created)
Step – 3: Create Custom HTML Tag & paste the following code.
Create a custom HTML Tag, named ‘Facebook_Purchase‘ & paste the following code
<script>
fbq('track', 'Purchase', {{customDataFacebook}} );
</script>
Step – 4: Implement Tag Sequencing
Step – 5: Create an Event Trigger
6.) Lead & CompleteRegistration
- Successfully submits the Form – CompleteRegistration.
- Successfully signs up for freetrail, subscribes, etc (other lead captures)
Step – 1: Populate the dataLayer
<script>
var window.dataLayer = window.dataLayer || []

dataLayer.push({
'event' : 'LeadSuccess',                         //used for creating GTM trigger
customDataFB :
     {  'content_name : 'Email_Subscription',
        'content_category': 'Email',                                //(Optional)
        'value' : 180,
        'currency' : 'USD'
        }
}
</script>
For CompleteRegistration Event:
<script>
var window.dataLayer = window.dataLayer || []
dataLayer.push({
'event' : 'RegistrationSuccess',                         //used for creating GTM trigger
customDataFB :
     {  'content_name' : 'SEOTool' ,
        'value' : 180,
        'currency' : 'USD'
        'status' : 'Pending_Email_Verification'
        }
}
</script>
Step – 2: Create a GTM Variable – ‘customDataFacebook’ (Skip This Step if Already Created)
Step – 3: Create Custom HTML Tag & paste the following code.
<script>
fbq('track', 'Lead', {{customDataFacebook}} );
</script>
<script>
fbq('track', 'CompleteRegistration', {{customDataFacebook}} );
</script>
Step – 4: Implement Tag Sequencing
Step – 5: Create an Event Trigger
Step – 6: Use Facebook Pixel Debugger & Create Conversions & Audiences
7.) Search
Step – 1: Create Custom HTML Tag
- ‘/search/BlackShoes/’ —> Format: ‘/search/{SEARCHQUERY}’
- /?q=BlackShoes’ —–> Format: ‘?q={SEARCHQUERY}’
- /?search=BlackShoes’ —–> Format: ‘?search={SEARCHQUERY}’
- /?d=Desktop&query=BlackShoes’ —–> Format: ‘query={SEARCHQUERY}’
<script>
//Insert the URL Format for search URL ////////
var searchFormat = '/search/{SEARCHQUERY}'             //Enter YOUR URL Format

var reg = new RegExp(searchFormat.replace('{SEARCHQUERY}','([^\?|\/|&]+)'))
var search_string = decodeURIComponent(reg.exec(location.href)[1])


var customDataFB =  { 'search_string' : search_string,
        'content_ids : ['SKU#1' , 'SKU#2' ],
        'contents' : [ {'id' :'SKU#1',                              // Items returned after search
                          'price' : 30 }
                          {'id' : 'SKU#2',
                            'price' : 40],
        'value' : 70,
        'currency' : 'USD'
          }

fbq('track', 'Search', customDataFB );

</script>
Step – 2: Implement Tag Sequencing
Step – 3: Add a Search Success Trigger
8.) Contact
- Telephone/SMS
- Chat plugins
- Other contacts
The process is quite similar to previous ones…
Step – 1: Create Custom HTML Tag
<script>
fbq('track', 'Contact');
</script>
Step – 2: Implement Tag Sequencing
Step – 3: Add a Chat Initiate Success Trigger
9.) Customize Product
Step – 1: Create Custom HTML Tag
<script>
fbq('track', 'CustomiseProduct');
</script>
Step – 2: Implement Tag Sequencing
Step – 3: Add a Chat Initiate Success Trigger
10.) Donate
- You/Your website/project.
- A particular cause
The event name is simply denoted by “Donate”
Step – 1: Create Custom HTML Tag
<script>
fbq('track', 'Donate');
</script>
Step – 2: Implement Tag Sequencing
Step – 3: Add a Chat Initiate Success Trigger
11.) Find Location
Step – 1: Create Custom HTML Tag
<script>
fbq('track', 'FindLocation');
</script>
Step – 2: Implement Tag Sequencing
Step – 3: Add a Chat Initiate Success Trigger
12.) Schedule
Step – 1: Create Custom HTML Tag
<script>
fbq('track', 'Schedule');
</script>
Step – 2: Implement Tag Sequencing
Step – 3: Add a Chat Initiate Success Trigger
13.) Start Trial
Step – 1: Populate the dataLayer
<script>
var window.dataLayer = window.dataLayer || []
dataLayer.push({
'event' : 'TrailStarted', //used for creating GTM trigger
customDataFB :
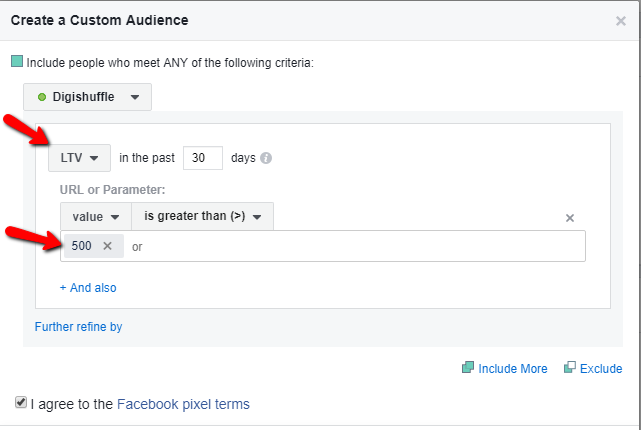
{ 'predicted_ltv' : '500',
'value' : 180,
'currency' : 'USD'
}
})
</script>
Step – 2: Create a GTM Variable – ‘customDataFacebook’ (Skip This Step if Already Created)
Step – 3: Create Custom HTML Tag & paste the following code.
<script>
fbq('track', 'StartTrial', {{customDataFacebook}} );
</script>
Step – 4: Implement Tag Sequencing
Step – 5: Create an Event Trigger
Step – 6: Use Facebook Pixel Debugger & Create Conversions & Audiences
14.) Subscribe
Step – 1: Populate the dataLayer
<script>
var window.dataLayer = window.dataLayer || []

dataLayer.push({
'event' : 'SubscriptionStarted',                         //used for creating GTM trigger
customDataFB :
     {  'predicted_ltv' : '500',
        'value' : 200,
        'currency' : 'USD'
       }
})
</script>
Step – 2: Create a GTM Variable – ‘customDataFacebook’ (Skip This Step if Already Created)
Step – 3: Create Custom HTML Tag & paste the following code.
<script>
fbq('track', 'Subscribe', {{customDataFacebook}} );
</script>
Step – 4: Implement Tag Sequencing
Step – 5: Create an Event Trigger
Step – 6: Use Facebook Pixel Debugger & Create Conversions & Audiences
15.) Submit Application
- Job application
- Educational programme
- Credit Card
- Other application
Step – 1: Create Custom HTML Tag
<script>
fbq('track', 'SubmitApplication');
</script>
Step – 2: Implement Tag Sequencing
Step – 3: Add a Chat Initiate Success Trigger
Step – 4: Use Facebook Pixel Debugger & Create Conversions & Audiences
You can check form tracking guide for step by step tracking 3rd party forms like contact form7, caldera form, jot form & more..
Too Many Facebook Pixel Tags, Is There any other way to Reduce It?
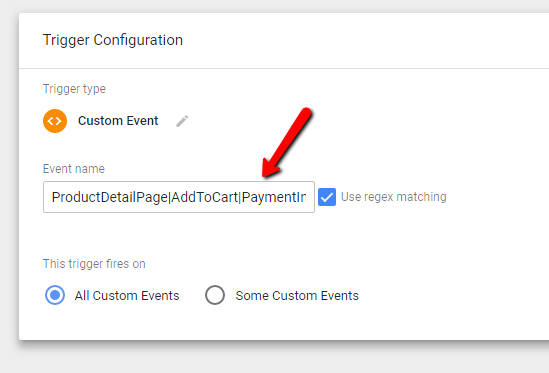
Step – 1: Add All Tags in Custom HTML
<script>

if ({{Event}} == 'ProductDetailPage')
{
fbq('track', 'ProductDetailPage', {{customDataFacebook}} );
}

if ({{Event}} == 'AddToCart')
{
fbq('track', 'AddToCart', {{customDataFacebook}} );
}

if ({{Event}} == 'PaymentInfoAdded')
{
fbq('track', 'PaymentInfoAdded', {{customDataFacebook}} );
}

if ({{Event}} == 'CheckoutInitiated')
{
fbq('track', 'CheckoutInitiated', {{customDataFacebook}} );
}

if ({{Event}} == 'TransactionSuccess')
{
fbq('track', 'TransactionSuccess', {{customDataFacebook}} );
}
</script>
Step – 2: Create a Common Trigger via Regex
Want to Implement Facebook Dynamic Remarketing?
- ViewContent
- AddToCart
- Purchase
Have You Implemented Enhanced E-commerce In Google Analytics via GTM?
Important Points:
- You can event fire these events without the parameters. simply fbq(‘track’, ‘ViewContent’)
- Events take some time to populate in Facebook Events Manager. Only after that, you’ll be able to create custom conversions & build audiences.
- You can even use the manual method for implementation but the pros of GTM are the same values can be used for dynamic remarketing on Google Display network & Enhanced Ecommerce Tracking in Google Analytics.
- Feel Free To Comment if you have any doubts/issues 😉
Want More Articles To Gain More Insights From Your Website Visitors ??
300+ Facebook Metrics List [Ad Insights + Page Metrics] With Definition
Facebook Pixel Helper: How To Use? & Debug Pixel Errors The Proper Way [BONUS TIPS]
Automated Cost Data Import – Facebook To Google Analytics
16 Facebook Custom Events To Build Custom Audiences & Define Conversions
Ritwik is a Web Analyst & Product Marketer. He loves to write technical & easy to understand blogs for Marketers & Entrepreneurs. Focused on Google Analytics, Facebook Analytics, Tag Management, Marketing & Automation Scripts & more. Google Certified Professional. A Firm Believer in Teaching -> Learning -> Growing. :)
¡Hola!
Muy interesante el artículo pero tengo una duda muy básica, ¿puedo usar el mismo evento estándar para diversas landing pages, y por lo tanto, diferentes campañas de Facebook?
Por ejemplo usar el de registro completo varias veces:
fbq(‘track’, ‘CompleteRegistration’ );
Gracias
Sí
Puede usar el parámetro ‘content_name’ para diferentes páginas de inicio y campañas de Facebook.
P.ej:
fbq (‘track’, ‘CompleteRegistration’, {‘content_name’: ‘campaign1_landingpage1’});
O
fbq (‘track’, ‘CompleteRegistration’, {‘content_name’: ‘campaign2_landingpage2’});
& pronto…….
Entonces, puedes filtrarlo en Facebook
tablero.
Consulte: https: //developers.facebook.com/docs/ads-for-websites/pixel-events/v3.0#events