
Last Updated on April 22, 2019 by Ritwik B
Enhanced E-Commerce Reports is one of the most powerful reports in Google Analytics. In this article, you’ll learn to implement the enhanced e-commerce tracking via GTM.
Google Tag Manager simplifies the process of implementation & also it is much more beneficial than google analytics implementation because the same e-commerce data collected in dataLayer can be used in
- Analytics tools such as mixpanel, amplitude, etc
- Ad networks such as Facebook, Twitter
- Remarketing – Dynamic Remarketing in Google or Facebook
- & so on
So it is always scalable to use GTM for tracking purposes.
Here are some of the myths related to Enhanced Ecommerce
- Myth: Enhanced E-commerce Tracking can only be implemented on E-commerce Sites.
Reality: It can be implemented on any site. Most important thing is to understand which e-commerce code populates which metric/dimension. - Myth: We need server-side access to implement Enhanced E-commerce.
Reality: We can even implement it client-side. But it is recommended to use server-side variables. - Myth: We have to implement each & every code as specified in the GTM Doc.
Reality: We can implement any portion of the code. - Myth: DataLayer Code placement is important.
Reality: We can place it anywhere on the page by using custom events to fire e-commerce code. - Myth: It is too difficult to implement enhanced e-commerce
Reality: Just follow this article & that myth would be busted 😃
Let’s start with the framework to follow
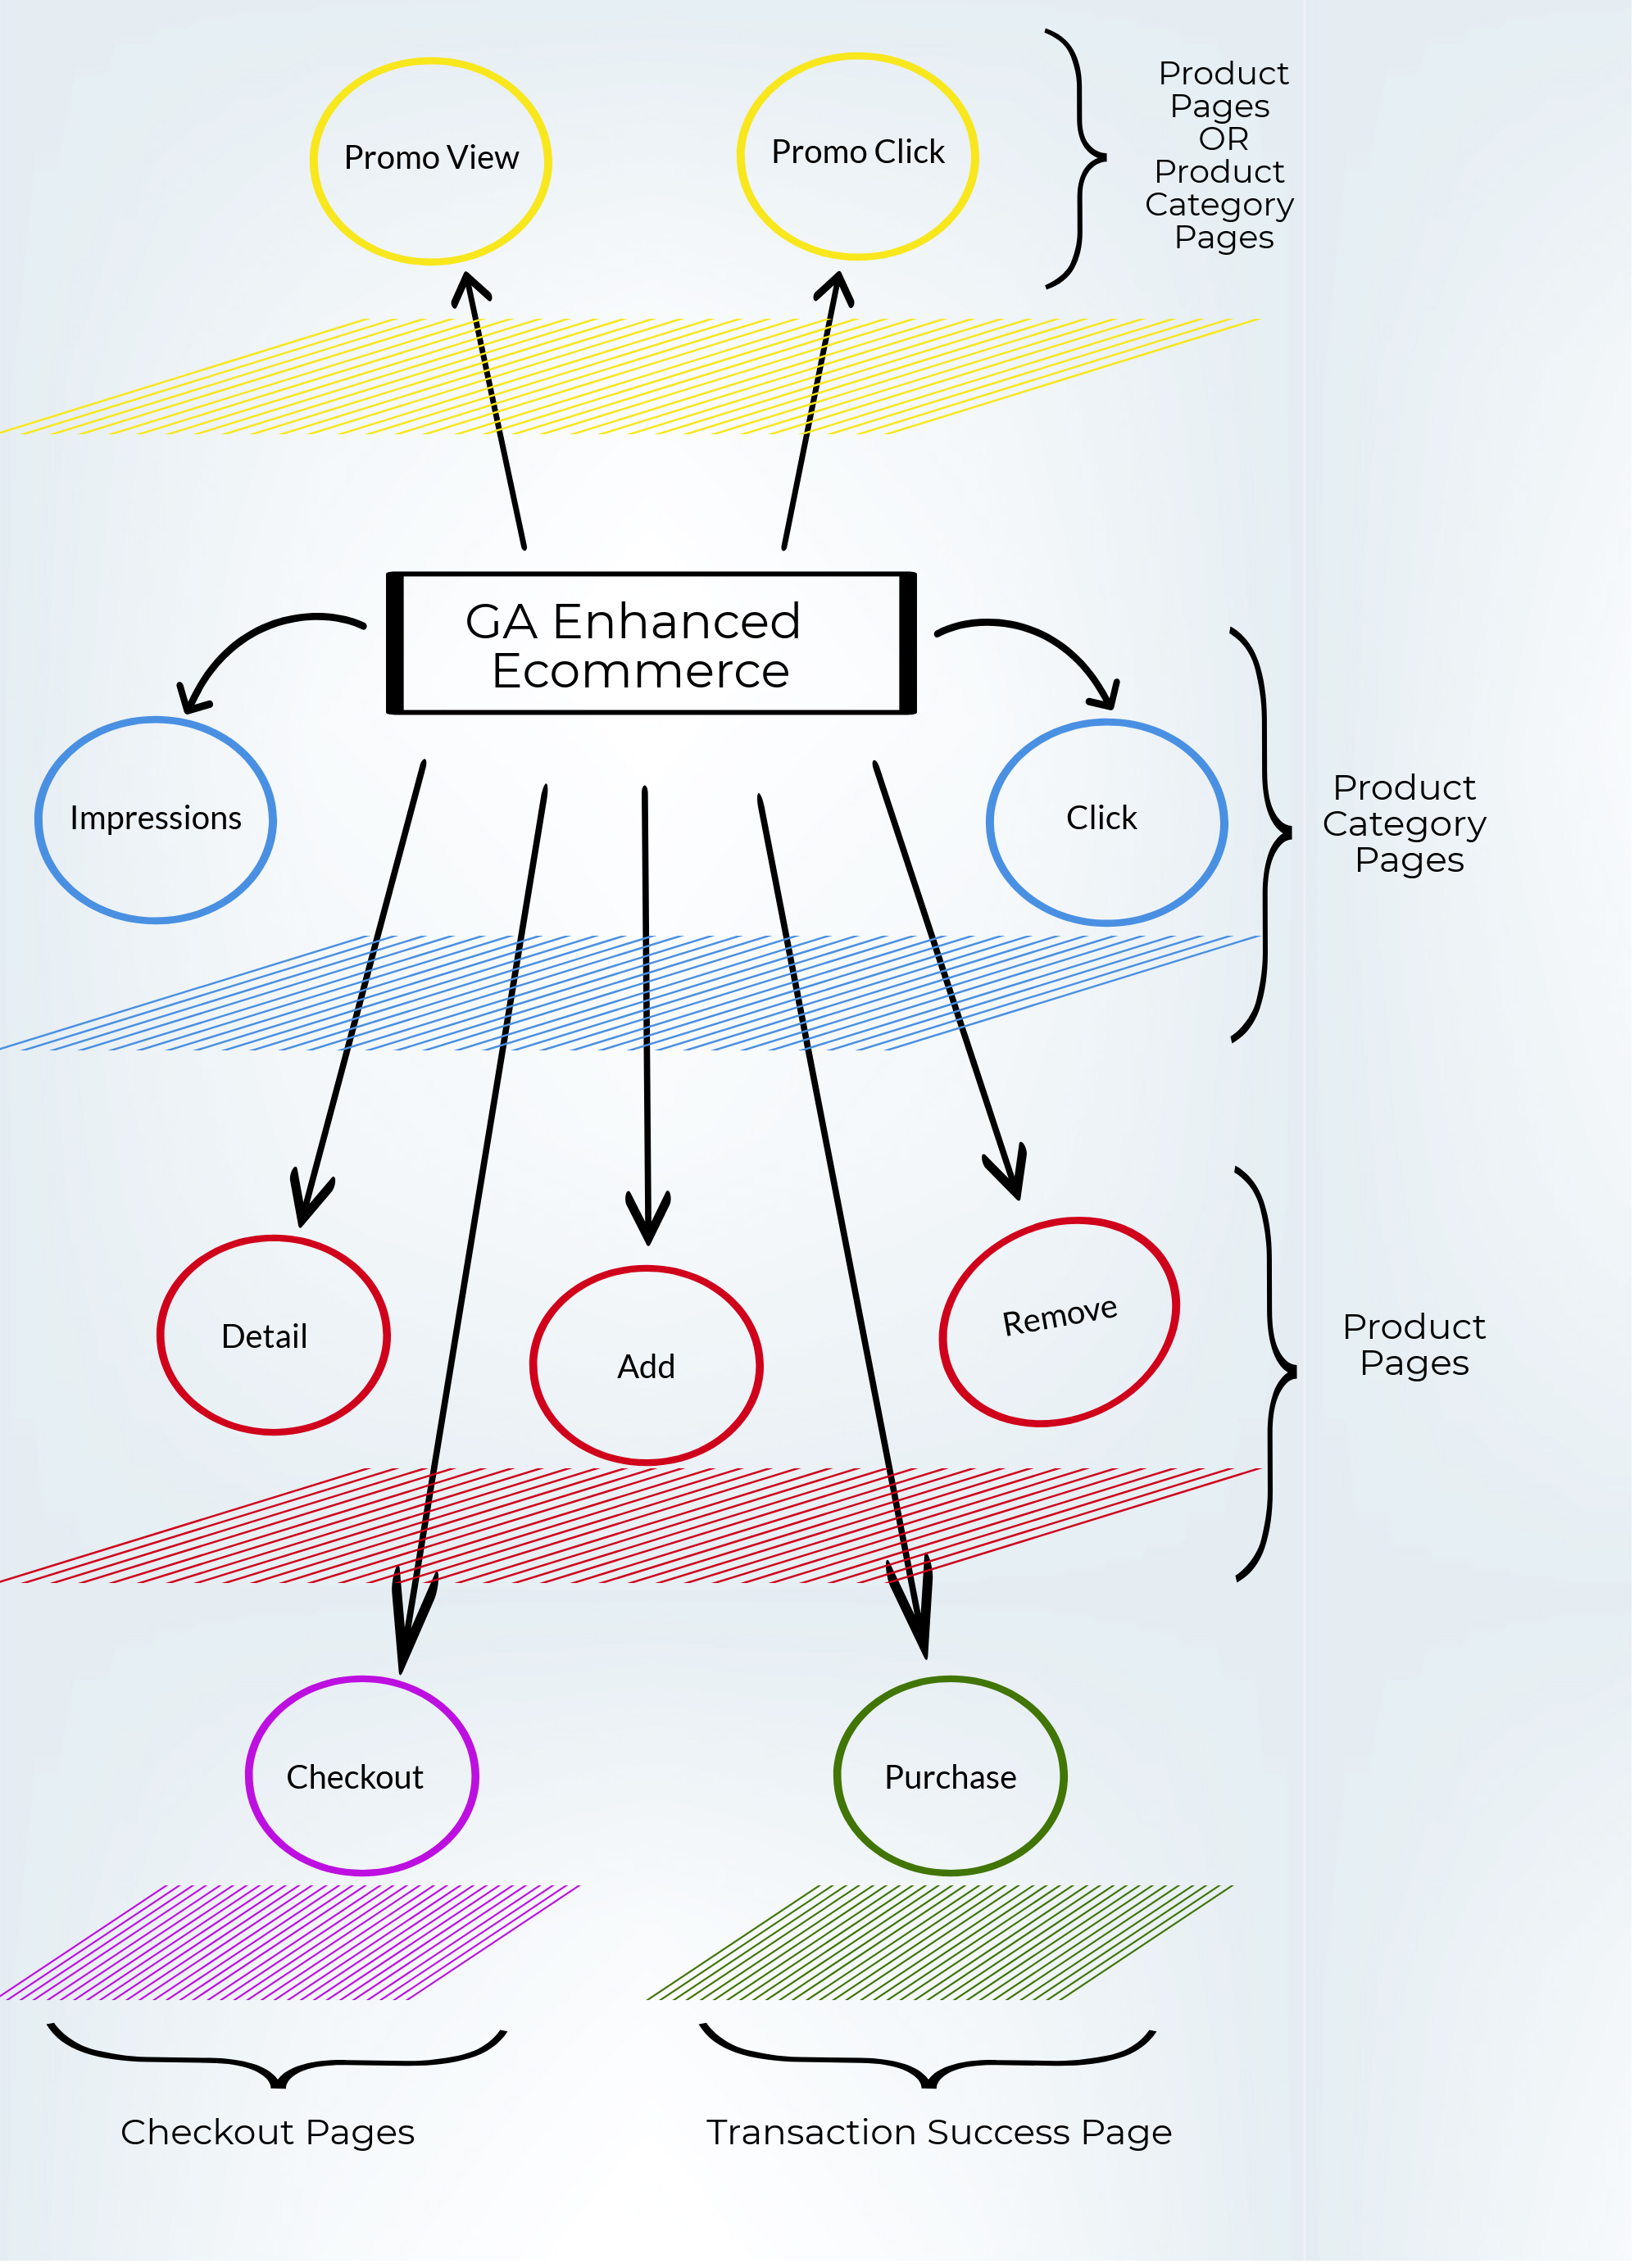
Google Analytics Enhanced Ecommerce Framework
Google has defined an ‘ecommerce’ Object containing the following ecommerce measurement objects, namely
- impressions
- click
- detail
- add
- remove
- checkout
- checkout_option
- purchase
- refund
- promoView
- promoClick
To make it easy to understand,
Google has defined different E-commerce Codes for measuring different User Actions.
Every code will populate a particular dimension/metric in the analytics ecommerce report.
The format of the ecommerce code is also easy to visualize as the code starts with
{ ‘ecommerce’ : { USER_ACTION : ….
Eg:
- { ‘ecommerce’ : { ‘impressions’ : … represents Product Impressions Data
- { ‘ecommerce’ : { ‘click’ : … represents Product Click Data
- { ‘ecommerce’ : { ‘add’ : … represents Add To Cart Data
- { ‘ecommerce’ : { ‘remove’ : … represents Remove From Cart Data
- { ‘ecommerce’ : { ‘checkout’ : … represents Checkout Steps Data and so on………..
We’ll now be implementing these different blocks of code one by one on different pages.
Make sure to follow this framework or ask your developer to stick it on the wall while implementation process.
Steps for Google Analytics Enhanced Ecommerce via GTM
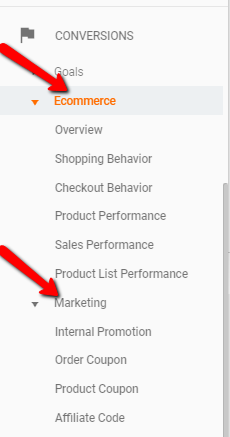
Step – 1: Toggle Enhanced e-commerce in Google Analytics (recommended in Test View)
This is a most important step to which lets the analytics show processed & configured in the ecommerce Reports.
Make sure you have a test view created, if not just create a new one. It’s not a good idea to do test tracking in your main (filtered view).
In the Test View, Go To E-commerce Settings > Enable E-commerce > Enable Enhanced E-commerce.
After enabling, you can see the new blank reports in the Conversions > Ecommerce tab.
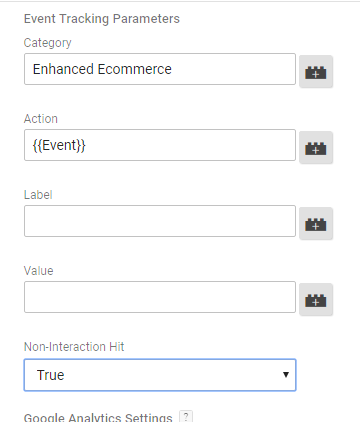
Step – 2: In GTM, Create Google Analytics Event Tag with Enhanced Ecommerce dataLayer Option Checked.
Just create one analytics event tag in google tag manager.
- Category : ‘Enhanced Ecommerce’
- Action: ‘{{Event}}’
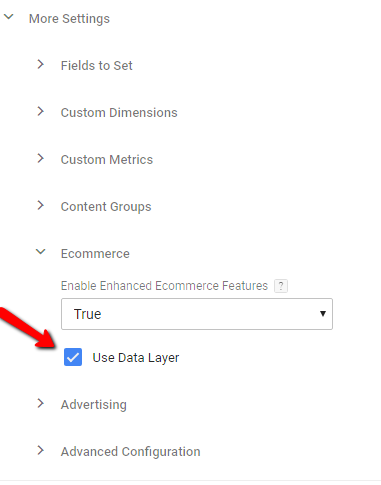
Enable the dataLayer option in More Settings > Ecommerce.
Save the Tag without Trigger. We’ll be constructing the trigger in below steps.
Step – 3 : Implement Product ‘Impressions’ & ‘Click’ Code on Product Listing Pages.
Product listing pages are the pages where products are listed in bulk. These pages may be
- Search Results pages
- Product Category Pages
- Related Product Widget Pages
- “People who bought this also bought…” widget pages, etc
These ‘impressions’ & ‘click’ code are related & I’ll tell you why.
First, let’s go with ‘impressions’ code.
To implement E-commerce ‘impression’ code follow this logic
- Populate Product Data in an array of objects. (named productImpressionArray)
- Pass it in the ecommerce ‘impression’ object.
- Push ecommerce object to dataLayer.
<script>
var window.dataLayer = window.dataLayer || []

//Step-1: Populate product in an array //
var productImpressionArray = [
{
'name': 'Product #1',      // Name or ID is required.
'id': '101',
'price': '15.25',
'brand': 'Nike',
'category': 'Shoes',
'variant': 'Gray',
'list': 'Search Results',
'position': 1
},
{
'name': 'Product #2', // Name or ID is required.
'id': '102',
'price': '22.11',
'brand': 'Puma',
'category': 'Shoes',
'variant': 'Black',
'list': 'Search Results',
'position': 2
},
...................
]

//Step - 2: Pass it in ecommerce object //
var ecommerceObject = {
 'ecommerce' : { 'impressions' : productImpressionArray },
'event' : 'productImpressions'                                     //pass custom event
 }

//Step - 3: Push to DataLayer//
dataLayer.push(ecommerceObject)

</script>
- Use a JS listener to listen for product clicks.
- Pass clicked product in the array of object, named ‘productClickedArray’. (You can match the ‘id’ of clicked product from previous productImpressionArray variable & fetch the same.)
- Push ecommerce ‘click’ object to ecommerceObject.
- Push ecommerceObject to dataLayer.
<script>
// Inititalize Click Listener //


// Pass clicked Product in array of object //
var productClickedArray = [{
'name': 'Product #1',             // Name or ID is required.
'id': '1',
'price': '15.25',
'brand': 'Nike',
'category': 'Shoes',
'variant': 'Gray',
'position': 2
}]

//Pass the Product clicked data in ecommerce object //
var ecommerceObject = {
'ecommerce' : { 'click' :
{ 'products' : productClickedArray,
  'actionField' : {'list' : 'Search Results' }             // Pass the correct page type in place of 'Search Results'.
}
},
'event' : 'productClick'                                     //pass custom event
}

//Push the ecommerceObject in dataLayer
dataLayer.push(ecommerceObject)

</script>
Step – 4 : Implement Product ‘Detail’ & ‘Add’ Code on Product Details Pages.
- Pass Product Data in an array of objects. (named productDetailArray)
- Pass it in the ecommerce ‘detail’ object.
- Push ecommerce object to dataLayer.
<script>
var window.dataLayer = window.dataLayer || []
//Step-1: Pass Product Data in an array of objects //
var productDetailArray= [
{
'name': 'Product #1',      // Name or ID is required.
'id': '101',
'price': '15.25',
'brand': 'Nike',
'category': 'Shoes',
'variant': 'Gray'
}
]

//Step - 2: Pass it in ecommerce object //
var ecommerceObject = {
'ecommerce' : { 'detail' :
{ 'products' : productDetailArray,
  'actionField' : {'list' : 'Related Products'}
}
},
'event' : 'productDetail'                                   //pass custom event
}

//Step - 3: Push to DataLayer//
dataLayer.push(ecommerceObject)

</script>
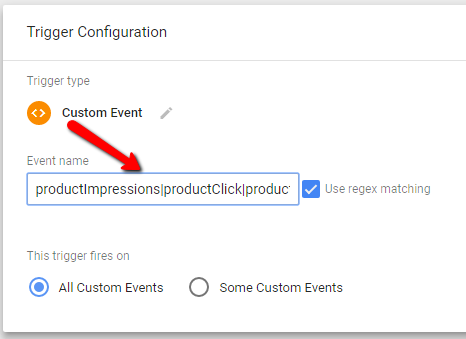
Modify the previous trigger & add the custom event ‘productDetail’. Now the trigger should look like
‘productImpressions|productClick|productDetail’
- You can use AddToCart callback(ajax success callbacks) if any, to push the product details in dataLayer.
- Populate the ecommerce ‘add’ object
- Pass the same in dataLayer
<script>
// Pass Product added to cart in array of object //
var productAddToCartArray = [{
'name': 'Product #1',             // Name or ID is required.
'id': '1',
'price': '15.25',
'brand': 'Nike',
'category': 'Shoes',
'variant': 'Gray',
'quantity': 1
}]

//Pass the Product Add To Cart data in ecommerce object //
var ecommerceObject = {
 'ecommerce' : { 'add' :
{ 'products' : productAddToCartArray },
'currencyCode' : 'EUR'                                           (Optional)
},
'event' : 'productAddToCart'                                     //pass custom event
}

//Push the ecommerceObject in dataLayer
dataLayer.push(ecommerceObject)
</script>
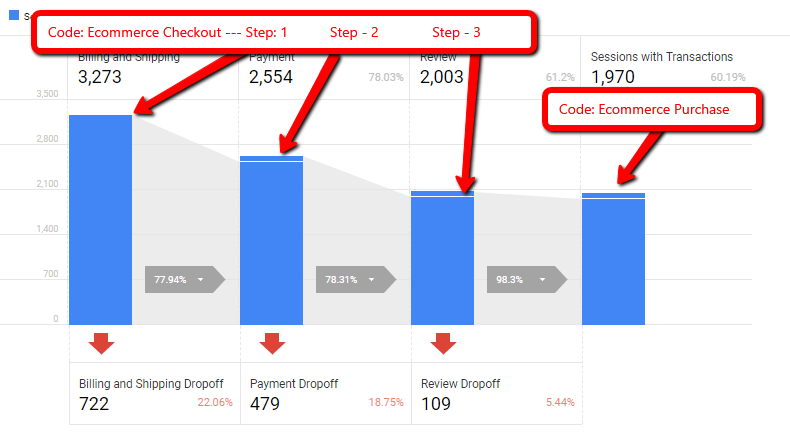
Step – 5 : Implement ‘Checkout’ Code on Checkout Pages & ‘Purchase’ Code on Transaction Success Page.
- Step – 1: User Info
- Step – 2: Billing Info
- Step – 3: Shipping
- Step – 4: Payment Info
- Step – 5: Confirm
- You can use successful callbacks for each step to trigger the code.
- Pass the products added to cart in the array of objects, named productCheckoutArray.
- Push the productCheckoutArray data to the ecommerce ‘checkout’ object.
- Push the ecommerceObject data to dataLayer.
<script>
// Pass Products added to cart in array of object //
var productCheckoutArray = [{
'name': 'Product #1',             // Name or ID is required.
'id': '1',
'price': '15.25',
'brand': 'Nike',
'category': 'Shoes',
'variant': 'Gray',
'quantity': 1
},
{
'name': 'Product #2',             // Name or ID is required.
'id': '2',
'price': '22.10',
'brand': 'Puma',
'category': 'Shoes',
'variant': 'White',
'quantity': 2
}]

//Push the product array data to the ecommerce 'checkout' object. //
var ecommerceObject = {
 'ecommerce' : { 'checkout' :
{
'products' : productCheckoutArray,
'actionField' : {'step' : 1 }                // Enter Step Number.
}
}
'event' : 'productAddToCart'                                     //pass custom event
}

//Push the ecommerceObject data to dataLayer.//
dataLayer.push(ecommerceObject)
</script>
In the above code the important step is the Step Number. It will be reflected in the E-commerce — > Checkout Behaviour Report in Google Analytics.
- Pass the same product array of objects obtained in checkout steps in productTransactionArray.
- Pass transaction info in ‘action field’ object as
- Transaction/Order ID
- Revenue. (Should be addition of all products + tax + shipping )
- tax (optional)
- shipping (optional)
- coupon (optional)
- affiliation (optional)
- Pass all the above info in ecommerce ‘purchase’ object
- Pass the ecommerceObject in dataLayer.
<script>
// Pass Purchased Products in array of object //
var productPurchasedArray = [{
'name': 'Product #1',             // Name or ID is required.
'id': '1',
'price': '40',
'brand': 'Nike',
'category': 'Shoes',
'variant': 'Gray',
'quantity': 1,
'coupon': 'SUMMER'
},
{
'name': 'Product #2',             // Name or ID is required.
'id': '2',
'price': '20',
'brand': 'Puma',
'category': 'Shoes',
'variant': 'White',
'quantity': 2
}]

var actionField = {
'id': 'T12345',                                            // Transaction ID. Required for purchases and refunds.
'affiliation': 'Online Store',
'revenue': '97',                                      // Total transaction value (incl. tax and shipping)
'tax':'5.5',
'shipping': '11.5',
'coupon': 'SUMMER_SALE'
}


//Push the product array data to the ecommerce 'purchase' object. //
var ecommerceObject = {
'ecommerce' : {'purchase' : {
'products' : productPurchasedArray,
'actionField : actionField                //.
}},
'event' : 'transactionSuccess'                                     //pass custom event
}

//Push the ecommerceObject data to dataLayer.//
dataLayer.push(ecommerceObject)
</script>
What About PromoViews, PromoClicks & Refunds?
Let’s talk about promoViews & promoClicks. It is quite similar to ecommerce ‘impressions’ & ‘clicks’ code.
Now it depends on the pages where you implement these promos.
Let’s say you implement it on Product Detail Page.
You can.
- Pass all the Promos in an array of objects. (named promotionArray)
- Pass this promo array to ecommerce ‘promoView’ object.
- Pass ecommerceObject in dataLayer.
<script>
// Pass Products added to cart in array of object //
var promotionsViewArray = [{
'name': 'Summer Offer',             // Name or ID is required.
'id': 'SUMMER_SALE',
'creative': 'banner1',
'posiiton': 'slot1'
},
{
'name': 'Free Shipping',             // Name or ID is required.
'id': 'FREE_SHIP',
'creative': 'banner1',
'posiiton': 'slot1'
}]

//Push the product array data to the ecommerce 'checkout' object. //
var ecommerceObject = {
 'ecommerce' : { 'promoView' :
{
'promotions' : promotionsViewArray
}
}
'event' : 'promoView'                                     //pass custom event
}
//Push the ecommerceObject data to dataLayer.//
dataLayer.push(ecommerceObject)

</script>
For PromoClicks, you can implement a click listener follow the same logic as ‘click’ or ‘addtocart’.
<script>
// Pass Product added to cart in array of object //
var promoClickArray = [{
'name': 'Summer Sale',             // Name or ID is required.
'id': 'SUMMER_SALE',
'creative': 'Banner1',
'position': 'LeftBanner1'
}]

//Pass the Product Add To Cart data in ecommerce object //
var ecommerceObject = {
 'ecommerce' : { 'promoClick' :
{ 'promotions' : promoClickArray }
},
'event' : 'promoClick'                                     //pass custom event
 }

//Push the ecommerceObject in dataLayer
dataLayer.push(ecommerceObject)
</script>
You can also combine more than one code. Eg: If the promo is on product detail page along with Impressions., then 3 e-commerce codes will fire simultaneously the promoView, detail & impressions.
<script>
dataLayer.push({
'ecommerce' : { 'promoView' : ........
              { 'detail' : ............
              { 'impressions' : ...........
})

</script>
For refunds simply use this code as per gtm docs. You can change the Transaction/Order ID of refunded data.
dataLayer.push({
  'ecommerce': {
    'refund': {
      'actionField': {'id': '12344'}         // Transaction/Order ID. Required for purchases and refunds.
    }
  }
});
The Final Trigger Should include all custom events:
productImpression|productClicks|productDetail|productAddToCart|productCheckout|transactionSuccess
Make sure to preview all the events before publishing to live view.
Important Points
- You can implement & test the code one by one, if possible.
- You can start the implementation from the purchase code, then move on to checkout, add to cart & so on….
- The Transaction & Revenue data in GA will match the backend data 95% of the time. The reason behind it would be a topic for the later post.
- Feel Free to comment if you implement it successfully or have issues 🙂.
Other Articles:
Top 10 Ecommerce Tracking Issue Fixes: Is Your Code Not Working? Data Discrepancy? & More…
How To Track Multiple Ecommerce Funnels in Google Analytics (Analytics Hacks)
Bounce Rate Bible: Bounce Rate Benchmarks[2016/2017]
Ritwik is a Web Analyst & Product Marketer. He loves to write technical & easy to understand blogs for Marketers & Entrepreneurs. Focused on Google Analytics, Facebook Analytics, Tag Management, Marketing & Automation Scripts & more. Google Certified Professional. A Firm Believer in Teaching -> Learning -> Growing. :)
rien compris.
Hello Ritwik, thanks a lot for this amazing content ! It is so clear right now ! I just have one question. Does this code must be placed before of after the GTM container code, and do we have to modify anything in the GTM container. Thanks a lot for your help 🙂 Thomas
Thanks Thomas..!! You can place the code anywhere but make sure to have these to the custom HTML code
1.) ‘var window.dataLayer = window.dataLayer || []’ (line at the top of the code)
2.) The ‘event’ property in ‘ecommerceObject’.
Debug the code & check if the values are Ok.
Ritwik.
Okay, It works for me 🙂 Thanks a lot !
Hello Ritwik, thanks it’s very clear but i’ve got a question, how do you track multiple funnel with enhanced please ?
Let me explain, i’ve got one funnel with log in or create an account option (see the attach).
https://uploads.disquscdn.com/images/77347ac995385f956ceaf8068449594bada3bccdcefdf32ffacee22ed367bc16.png
I will use custom dim (prospect / customer) in order to analyze but i’m not quite sure how GA will send the info for my “already log” or between step 4 and step 6. Cause if i’m already log i can just confirm my billing adress and skip step 5.
But i want step 5 to be counted.
Thanks for your help,
Alan
Hi Alan,
The enhanced e-commerce funnels are single & sessions based. If you use Session level custom dimension (to segment Prospect/Customer), the only problem is if the (Customer)user logs out after transaction, the whole session gets attributed to (Prospect)Logged Out user. (Source:https://support.google.com/analytics/answer/2709828?hl=en )
For multiple funnels, I would suggest using event funnels, so the trick is to fire events at every step (Step-1, Step-2, Step-3) with a hit level custom dimension (Prospect / Customer) & then create a column dashboard using the funnel events. (Image below)
Pros: You can use user & sessions as metrics(Y-axis). Also, upto 9 funnel steps can be added. (they can also be filtered)
Thanks,
Ritwik
https://uploads.disquscdn.com/images/884de5271dae527b6f14fbf60a50d449bdc90bded2dad1e1f4823d1cf2fd3905.png
Hi Ritwik, great tutorial. You have listed down the steps in very clearly in understandable format. Just wanted to know why did you opted the product Impressions as event instead of pageview, even Enhanced Ecommerce (UA) Developer Guide suggests to use product Impressions as pageviews. Let me know your view on this https://uploads.disquscdn.com/images/17fad8a8097db78c281ca9659b55d7d352152450e095a19de1bd2f16d5f6dcae.jpg
Hey Ullas,
Great question..!! Here are some reasons why Events are more useful for ecommerce(or any) tracking.
1.) Scalable: If you have setup the ecommerce tracking with so much pain, why not send the data to other adnetworks/tools like Facebook, Amplitude/Mixpanel, Google Adwords Conversion, Bing Conversion Pixel, etc.
Just by creating custom HTML tags & using a ‘Single Regex Event’ trigger, data can be sent to various platforms.
The docs provided by various tools are only concerned about their own setup. But for businesses, I think its crucial to have a scalable solution with minimum coding/tags/trigger.
2.) Flexible: If you plan to shut any ecommerce code off, you can just do it by removing the “eventname” from the trigger. (“productImpressions|productClicks|checkout….etc”)
For large sites, product impressions might hit the daily limit, so it’s better to shut it off.
3.) Easy Verification: Also, Within a single report, you can verify all the ecommerce event (if working fine) in Top events > Event Category (Ecommerce).
Thanks,
Ritwik
Hi Ritwik, thanks for this great article. As I don’t have developers, is it possible to create all these tags using custom HTML tags inside GTM? (thus they won’t appear above the GTM snippet in the code of the page) ? Thanks very much
This script can be fired from a Custom HTML tag in Google Tag Manager and for that the Trigger should either be Dom Ready or Window Loaded.
Thanks very much!
Hi Ritwik,
This is indeed a good article.
I have followed the steps as suggested and the tag manager is also reflecting my datalayer variable but the same is not being reflecting in GA hence; i am bit struggling with data reflection issue in GA.
Can you pls suggest how to resolve this issue.
Screenshots for your reference:
https://uploads.disquscdn.com/images/6d9c1a6159b0d5f0b7b469ff611c7a4c2288042f974a3403480d190fc6eb15af.png
https://uploads.disquscdn.com/images/501034e13bb33c413b9331e910adfa7d3e09a9b47d4b3e3a829ad610c6c3ed02.png
Thanks !
Hi Avaneet,
Try entering ‘quantity’ key in product array (name,id,price & quantity). If you have only one product enter ‘quantity’:1.
Let me know if that works. 🙂
Thanks,
Ritwik
Thank you very much, will update you once I implement the same 🙂
hey it worked and it couldn’t be possible without your advise 🙂 Looking forward for more such articles from your end..thanks !
Hi, Thanks for laying out this so well. One question – to track sessions, pageviews on the pages that aren’t covered by the events in your article – do you set up GA pageview tag?
Thanks again.
Yes, the normal GA pageview tag fired on all pages. 🙂
Ritwik, sorry my ignorance, can I put exactly the same codes you give here or there are parts that must I change, the codes for products, is for all products, for example if have 300 products, must I put 300 codes?.
No.. Don’t put exact code. You will need to modify the product information in the code. So if each page displays 30 products, you will need add 30 product info in the product array.
Refer this site, where it is mentioned where/how to put the code
https://enhancedecommerce.appspot.com/