Dynamic Remarketing Code Setup – Google Tag Manager & Analytics

Dynamic Remarketing Hierarchy - Digishuffle
Dynamic Remarketing Methods

There are many ways you can implement dynamic remarketing.

We will be looking at Google Tag Manager —> Analytics methods to implement dynamic remarketing.

Kindly check the dynamic remarketing initial setup, where I have explained

  • How To Link Adwords & Analytics accounts?
  •  How to Preview Dynamic Remarketing Ads?
  • Some Myths about Dynamic Remarketing

Dynamic Remarketing using Google Tag Manager & Analytics

Step 1:

  • There are 3 custom parameters, you can implement
    • Product ID [Required]
    • Page Type [Optional]
    • Total Value [Optional]
  • These parameters are used as condition to create remarketing list in Adwords.
  • You are free to pass other values in optional attributes as per your needs.
  • In Analytics, go to Property > Custom Definition > Custom Dimensions.
  • Create 3 Hit level dimensions, (can name anything)
    • ecomm_prodid
    • ecomm_pagetype
    • ecomm_totalvalue
Dynamic Remarketing - Custom Dimension - Digishuffle

Step 2:

  • Go To Property > Audience Definition > Dynamic Attributes.
  • Create dynamic attribute linking.
  • Verify the business type, adwords linked account.
  • Assign the custom dimension created in Step#1 to respective attributes.
  • You can also assign only Product ID attribute & create remarketing list from Analytics.
Dynamic Attribute Linking - Digishuffle

Step 3:

  • In Google Tag manager, we will start with dataLayer placement methods.
  • Use this method if you have access to backend.
  • Place the code as below on pagetypes

Ritwik is a Web Analyst & Product Marketer. He loves to write technical & easy to understand blogs for Marketers & Entrepreneurs. Focused on Google Analytics, Facebook Analytics, Tag Management, Marketing & Automation Scripts & more. Google Certified Professional. A Firm Believer in Teaching -> Learning -> Growing. :)

Comments (2)

  1. Hi there Ritwik,

    This is an excellent guide and extremely helpful. I wonder if you could really breakdown steps 3 and 4 more as those are quite confusing. Also, I noticed you started using ecommerce business type instead of the custom business type which you used in part 1. It would be great if you could continue using the custom one.

    Thanks very much for this.

    Brian

    1. Hi Brian,

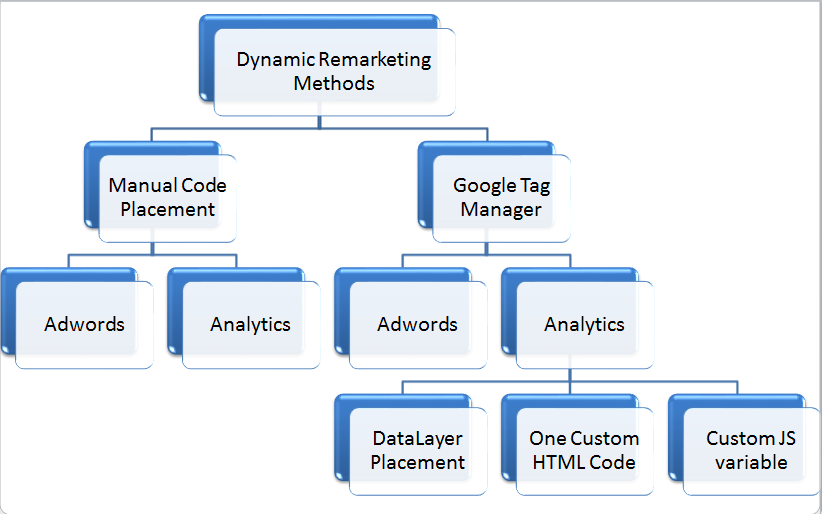
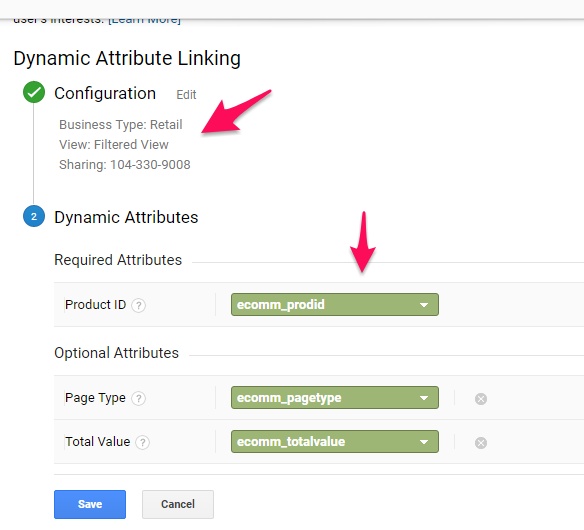
      The naming doesn’t matter. I can even name it as ‘ mysite_id ‘ , ‘mysite_page’ , ‘mysite_val’. There are 2 important steps.
      1.) First is the STEP – 2, to assign mysite_id to Product ID & so on……
      2.) Second important step is the values filled in spreadsheet. The ids column in spreadsheet/excel should match the values in Product ID variable (step 2).

      Maybe I’ll create live setup video soon.

      Thanks,

Leave a Reply

Your email address will not be published. Required fields are marked *